Kickstarter Camera Backpack: Padding, Dividers and Access Point Design
How do you specify a Kickstarter camera backpack that protects real equipment? Three decisions carry it: padding density and thickness, divider tolerance against actual camera bodies, and access point design. Sampling runs 6-10 working days, or 12-15 for builds with moulded panels, and production 35-50 days. Minimum order is 500 pcs per style and colourway, inspected to AQL 2.5 under ISO 2859-1, on FOB Xiamen terms with T/T 30/70 payment.
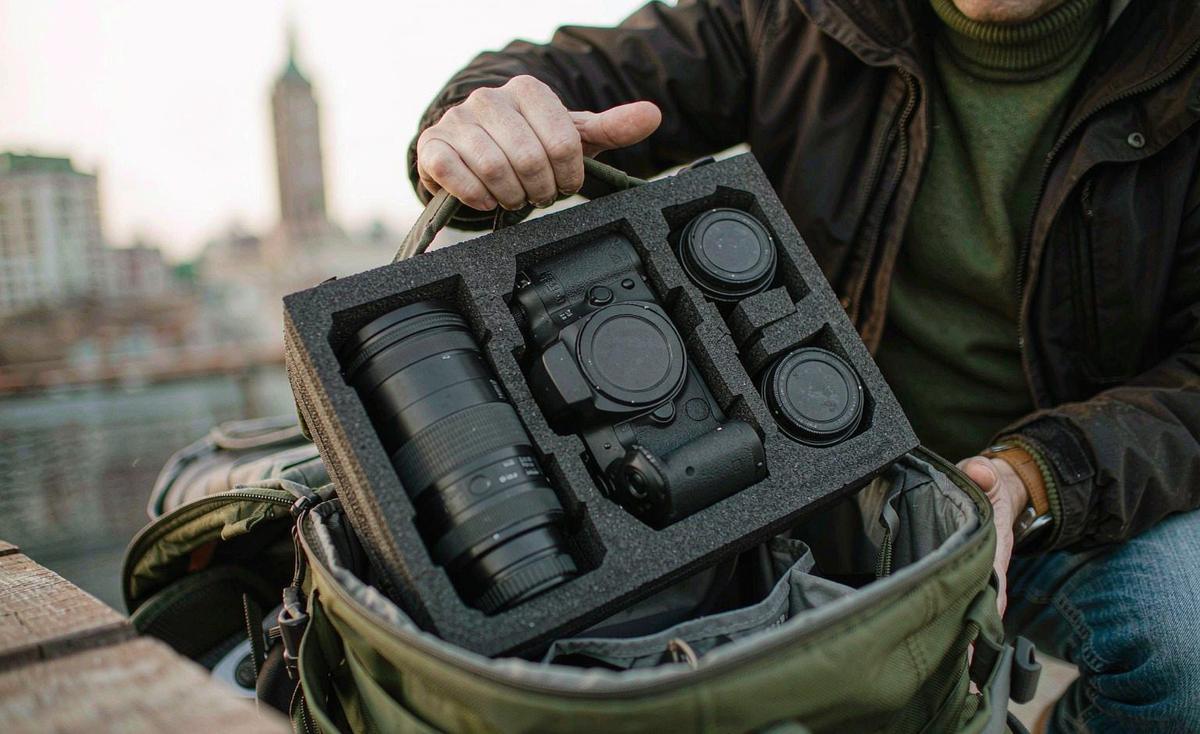
- What a camera backpack has to protect
- Padding: foam grades, density and thickness
- Divider systems: types, tolerances and cost
- Access point design: rear, side and top entry
- Load paths and how a camera pack carries weight
- Sizing the interior to real camera bodies
- Device sleeves in a camera build
- Weather protection: coatings and rain covers
- Cost drivers in a camera build
- Sampling and fit checks with real equipment
- Production tolerances and inspection checks
- Positioning the reward and planning a re-order
What a camera backpack has to protect
A camera pack is a protective case that happens to be worn on the back. That reframing changes the specification, because the design target is not comfort or capacity but impact protection under load. The gear inside is expensive, fragile at the mount point, and sensitive to compression as well as to shock. A lens mount takes load badly if the body is supported by the lens rather than by the body, and a camera left loose in a compartment suffers repeated small impacts that accumulate over a shoot. Design starts with what the gear can tolerate.
Three failure modes account for most damage claims. Direct impact, where the bag is dropped or knocked and the corner takes the load. Compression, where the bag is squeezed in overhead storage or under a seat and the gear is crushed. And abrasion, where gear rubs against gear inside a compartment that does not hold it still. Padding addresses the first two, dividers address the third, and access point design determines whether the user can actually configure the bag correctly every time they use it. Neglect any one of the three and the other two do not save the product.
Key takeaways
- Specify padding by density and thickness, not by a softness description; ask for density in kg per cubic metre.
- Divider tolerance is the difference between a snug fit and a lens that rotates under load, so dimension against real bodies.
- Rear access is the safest access point for gear security, side access is the fastest, and the two can be combined.
- Device sleeves must be suspended, so a laptop does not bottom out on the base seam when the bag is set down.
- A camera build is a complex build: plan 12-15 working days of sampling where moulded panels are involved.
Padding: foam grades, density and thickness
Padding is specified by material, density, thickness and construction. The common materials are EVA foam, PE foam, EPE expanded polyethylene and, for structured panels, a PE or EVA board laminated to fabric. EVA is denser and recovers better after compression; EPE is lighter and cheaper but takes a compression set over time. Ask your supplier for density in kilograms per cubic metre and for the compression set figure, because those are the two numbers that predict how the bag performs after a year of use rather than in the first week.
| Material | Typical density | Thickness used | Best placed at | Trade-off |
|---|---|---|---|---|
| EVA foam sheet | 90 to 140 kg/m3 | 8 to 12 mm | Base, side walls, dividers | Denser and costlier, recovers well |
| EPE foam | 25 to 45 kg/m3 | 10 to 15 mm | Top lid, lid filler | Light and cheap, takes compression set |
| PE board laminated | Rigid, 0.8 to 1.5 mm | Structural | Base board, back panel frame | Rigidity with little thickness |
| Moulded EVA shell | 120 to 180 kg/m3 | 15 to 25 mm | Front shell or camera cube | Tooling cost, best impact protection |
| Brushed tricot laminate | n/a | Surface layer | Contact faces of dividers | Prevents scratching, low cost |
Thickness has diminishing returns and a real cost. Going from 8 mm to 12 mm of EVA on the base adds protection where it matters most and roughly 0.80 to 1.60 USD per unit at 500 pcs; going from 12 mm to 20 mm adds bulk and cost for protection that most users will never need. The pattern that works is differential padding: thickest at the base and the lower side walls where the bag is set down and knocked, medium at the back panel where it also serves comfort, and lightest at the lid where weight matters least. Avoid uniform padding, which is either too heavy or too thin where it counts.
Specify the contact surface as well as the foam. A brushed tricot or a soft laminate on the faces that touch the gear prevents scuffing on camera bodies and lens barrels, and it costs very little. It also hides the foam edge and improves the perceived quality in photography, which matters on a campaign page where the interior is shown open. Ask for the laminate to be bonded rather than loose, because a loose lining bunches inside a divider and makes the fit sloppy.
Divider systems: types, tolerances and cost
Dividers are the single most visible quality signal in a camera bag, and the most common source of backer complaints. Too loose and gear shifts; too stiff and the compartment will not close around a body with a grip; too few and users cannot configure the layout they need. The three systems in common use are hook-and-loop attached padded panels, origami-fold panels that wrap around gear, and a removable padded insert or cube that lifts out of the bag entirely.
- Hook-and-loop attached panels: flexible, cheapest to produce, and the most common; expect 4 to 8 panels in a mid-size pack.
- Origami-fold panels: wrap and velcro to themselves, hold odd shapes better, add 1 to 2 USD per unit.
- Removable padded cube: the bag converts to a daypack, adds 6 to 12 USD, and raises the perceived value substantially.
- Rigid board dividers: firmer separation for heavy lenses, adds weight and cost, best in the lower compartment.
- Hybrid approach: hook-and-loop panels plus a removable cube, which is the configuration most premium campaigns use.
Tolerance is where the engineering actually happens. A divider system should be dimensioned against real bodies: a full-frame body with a battery grip, a 70-200 mm lens with the hood reversed, and a 24-70 mm lens mounted. Give those dimensions to the pattern maker and require the sample to be checked with physical equipment, not with a tape measure. The usual specification is that the interior holds the listed configuration with 3 to 5 mm of compression on the foam, which is enough to keep gear still without forcing the zip.
Ask for the pre-production sample to be photographed with the actual camera bodies and lenses you name on the campaign page, and keep those photographs with the approval record. It is the only way to confirm divider tolerance, and it gives you launch imagery that matches the production unit exactly.
Access point design: rear, side and top entry
Access point is the feature that decides how the bag is used in the field, and it is the one experienced backers judge first. Rear access means the gear compartment opens against the wearer's back, which is the most secure configuration because the opening cannot be reached while the bag is worn. Side access is a separate opening on one or both sides that lets a user swing the bag round and pull a body out without setting it down. Top access is a lid or flap opening, simplest to make and slowest to use.
| Access point | Security | Speed of use | Added unit cost | Structural impact |
|---|---|---|---|---|
| Rear panel full opening | High | Moderate | 3.50 to 6.00 USD | Panel becomes structural, needs frame |
| Side quick access, one side | Moderate | High | 2.00 to 3.50 USD | Local reinforcement and gusset |
| Side access, both sides | Moderate | High | 3.50 to 5.50 USD | Both gussets reinforced |
| Top lid with flap | Moderate | Low | 1.00 to 2.00 USD | Minimal, simplest to sew |
| Combination rear plus side | High | High | 5.50 to 9.00 USD | Most complex, needs careful patterning |
The combination of rear access and one side access is the configuration that most premium campaigns use, and it is worth the cost if the pledge supports it. It also creates a problem worth planning for: two openings into the same compartment means two zip runs that must not bind against each other when the bag is fully loaded. That is a patterning issue, and it is exactly the kind of fit fault that a single sample round will not reveal. Plan two sample rounds and test the second one loaded to the maximum configuration you advertise.
Zip specification follows from the access choice. A rear access run is long and curved, so it needs a chain that flexes and a storm flap or a covered garage to keep water out of the opening. Number 8 or number 10 coil chain is typical for the main run, with number 5 for smaller pockets. Ask for the pull test and cycle test results on the chain, and confirm the slider has a lock or a garage so the opening cannot work itself open under load. Our custom backpacks for Kickstarter pillar covers zip and hardware selection in general terms.
Load paths and how a camera pack carries weight
Camera gear is dense. A body plus two lenses plus a laptop easily reaches 6 to 9 kg, which is heavier than most daypack loads and much heavier per litre. That density changes the load path: the weight must travel from the gear compartment into the shoulder straps and the hip belt through the back panel, not through the base seam or through the divider system. A bag that carries well empty can carry badly loaded, and load is the only condition that matters for a camera pack.
- Put a rigid base board under the gear compartment so weight is distributed across the panel rather than hanging on the base seam.
- Extend the shoulder strap webbing past the anchor point and down the back panel, so load is carried on the full panel.
- Include a padded hip belt from roughly 25 L upward, because gear weight should sit on the hips.
- Add a load lifter strap between the top of the panel and the shoulder strap, which pulls the load closer to the back.
- Reinforce the divider attachment so dividers are not carrying vertical load of stacked gear.
Test the loaded behaviour at sampling stage, not in production. Load the sample to the maximum weight you intend to advertise, wear it for thirty minutes, and note whether the base sags, whether the panel bows away from the back, and whether the zip runs bind. Those three observations catch most structural problems before tooling or bulk is committed. Carton-level transit testing to ISTA 3A practice is also worth specifying for a camera pack, because the gear compartment has to survive a drop in transit as well as in use.
Sizing the interior to real camera bodies
Interior capacity should be expressed in equipment, not only in litres. A 20 L camera pack that holds a body with grip, two lenses and a 14 inch laptop is a clearer and more credible claim than a litre figure alone, and it is the specification that photographers actually compare. Build the interior around a target configuration, dimension it against real equipment, and state both the configuration and the volume on the campaign page. Where a bag is sold across markets, state the maximum device size in both inches and centimetres.
| Pack volume | Gear compartment configuration | Device sleeve | Typical user |
|---|---|---|---|
| 14 to 18 L | Body plus one lens, one spare lens | 13 inch tablet | Street and travel photographer |
| 20 to 26 L | Body with grip plus two lenses, drone or gimbal | 14 inch laptop | Working photographer, one day kit |
| 28 to 34 L | Two bodies, three lenses, accessories | 16 inch laptop | Assignment shooter, full kit |
| 36 to 45 L | Two bodies, four lenses, tripod carry | 16 inch laptop plus tablet | Travel and landscape work |
There is a marketing dimension to capacity claims. Overstating the configuration is the fastest way to negative reviews, because photographers will test it on the first day with the exact body named in your copy. Understating marginally is safer and reads as honesty. If your compartment fits a 70-200 mm lens only with the hood reversed, say so on the page; that level of specificity builds more trust than a generous claim, and it pre-empts the most common support question after delivery.
Device sleeves in a camera build
The device sleeve in a camera pack has two jobs that a normal laptop sleeve does not. It must be suspended, so the device does not bottom out against the base seam when the bag is set down hard, and it must be isolated from the gear compartment, so a lens barrel cannot press into the lid of a laptop. Both are achieved in the pattern: the sleeve is sewn into the panel with a floating base and a padded separation layer between the sleeve and the gear compartment. A sleeve that simply sits against the back panel with padding behind it will fail the first of those jobs.
Size the sleeve to the device, not to the marketing claim. A sleeve described as fitting a 16 inch laptop should accommodate the external dimensions of common 16 inch devices with a few millimetres of clearance, and it should be tested with a device in the sample. Add a false bottom of at least 15 mm of foam below the sleeve opening and a retention strap or a flap at the top so the device cannot slide out when the bag is tipped forward. Further guidance on structured device compartments is on the custom laptop bags for Kickstarter page.
Weather protection: coatings and rain covers
Photographers shoot in weather, so water resistance is a functional requirement rather than a marketing line. The normal specification is a coated shell fabric with a water repellent finish, covered or garaged zips on the main runs, and a separate rain cover stowed in a base pocket. Sealed seams are possible but expensive and stiff, and they are rarely necessary on a pack that also ships with a rain cover. Describe the bag as water resistant with a rain cover supplied, which is accurate, defensible and what most users actually need.
- Coated shell fabric with a durable water repellent finish, and a spray test result you can quote.
- Covered or garaged zips on the main compartment and the device sleeve.
- Rain cover in a dedicated base pocket, sized to the loaded bag rather than the packed one.
- Base fabric in a heavier denier or a coated woven, because the base is what gets set down on wet ground.
- Avoid claiming waterproof unless you have commissioned seam sealing and a defined test.
The rain cover is the cheapest high-perception addition in the whole specification, typically 2 to 3 USD landed and often sold as a 15 USD add-on. Specify it sized to the loaded dimensions of the bag, because a cover cut to the packed shape will not go on when the gear compartment is full. Add a reflective print or piping to the cover as well; it costs almost nothing and it is a genuine safety feature for photographers working near roads at dusk.
Cost drivers in a camera build
A camera backpack costs more per unit than a daypack of similar volume, for reasons that are entirely structural: more panels, more foam, more zips, more hardware and a higher labour content because of the divider assembly. The table below is a representative build for a 24 L camera pack at 500 pcs quoted FOB Xiamen. Use it as a template for your request for quotation and adjust the line items to your own specification.
| Line item | Cost per unit | Notes |
|---|---|---|
| Shell fabric, 600D or 900D coated polyester | 7.80 | Heavier denier at the base adds 0.50 |
| Lining and tricot laminate for contact faces | 3.60 | Brushed face prevents scuffing |
| Foam: EVA panels, EPE lid, PE base board | 5.40 | Differential thickness by panel |
| Divider set, 6 padded hook-and-loop panels | 4.90 | Origami style adds 1 to 2 |
| Zips: number 8 main plus number 5 secondary, 6 runs | 6.20 | Chain grade drives a large share of cost |
| Hardware: buckles, adjusters, strap hardware | 3.10 | Hip belt hardware adds 1.20 |
| Webbing, binding, thread, elastic | 2.80 | Consumables priced per roll |
| Moulded or laminated back panel | 4.50 | Tooling amortised over the run |
| Rain cover in base pocket | 2.40 | Sized to loaded dimensions |
| Labels, hangtag, polybag | 1.00 | Branding method priced separately |
| Cut, make and trim labour | 14.60 | Higher than a daypack at same volume |
| Overhead, inline and final inspection | 3.40 | Includes AQL 2.5 inspection |
That build totals roughly 59.70 USD FOB at 500 pcs, easing to about 51 to 55 USD at 2,000 pcs as fabric and hardware lots price down and line efficiency improves. Landed cost after sea freight of 6 to 11 USD and duty lands in the 62 to 76 USD range, which supports a pledge in the 169 to 199 USD band with healthy contribution. Below about 139 USD the same build becomes tight once platform fees, processing and a refund reserve are deducted, so price the specification first and set the pledge from it. Freight and landed cost planning is set out in the crowdfunding bag guide.
Sampling and fit checks with real equipment
Camera builds are complex builds, so sampling runs 12-15 working days rather than the standard 6-10. The extra time goes into patterning the divider system, fitting the curved rear zip run, and resolving how the moulded panel meets the base board. Plan two rounds: the first confirms the concept and the layout, the second confirms fit with real equipment and becomes the pre-production sample that bulk is matched against. Approve the second in writing, with photographs, and retain a reference sample.
- Minimum order quantity
- 500 pcs per style / colourway
- Sampling lead time
- 12-15 working days for camera builds
- Bulk production
- 35-50 days after deposit and approved pre-production sample
- Inspection standard
- AQL 2.5 to ISO 2859-1
- Transit test
- ISTA 3A practice where agreed
- Trade term
- FOB Xiamen
- Payment terms
- T/T 30/70
- Production floor
- 4,950 m2, SGS-verified
- Team and equipment
- 137 staff / 7 production lines / 149 machines
- Monthly capacity
- 200,000 pcs
Write the fit checks into the sample approval form so they are testable rather than subjective. Require that the named camera configuration fits with 3 to 5 mm of foam compression, that the rear zip opens and closes twenty times under full load without binding, that the side access allows a body to be withdrawn one-handed, and that the loaded bag carries without the base sagging. Those four checks are objective and they are the ones that predict whether the production run will satisfy the backers who know what they are doing. The process is described on crowdfunding bag sample prototyping.
Production tolerances and inspection checks
Padding and dividers introduce tolerance problems that a general bag inspection does not catch. Foam thickness varies by a millimetre or two between batches, and in a compartment dimensioned to 3 to 5 mm of compression that variation is the difference between snug and sloppy. Specify foam thickness with a tolerance, require the divider dimensions to be checked against the approved sample, and add a fit check with a test body or a gauge block to the inspection specification. Inspection itself runs at AQL 2.5 to ISO 2859-1.
- Divider dimensions measured against the approved sample on 8 pcs per lot, tolerance stated in the tech pack.
- Foam thickness checked at three points per panel, with the tolerance recorded.
- Zip run operation under load tested on 8 pcs, looking for binding on the curved rear run.
- Device sleeve drop test with a weighted plate, confirming the floating base protects the device.
- Divider hook-and-loop peel strength checked, because weak hook-and-loop is the most common field failure.
- Carton drop test to ISTA 3A practice on packed cartons where agreed.
Run an inline check at the point where the gear compartment is assembled, before the bag is closed out. Once a camera pack is closed, reworking the divider attachment or replacing a foam panel is expensive and slow, and at 500 pcs a systematic error found at final inspection means reworking the whole lot. An inline check after the first fifty units costs minutes and catches the pattern. The full inspection sequence is documented on Kickstarter campaign bag QA and QC.
On a camera pack the interior is the product. Backers forgive a plain exterior, they do not forgive gear that moves.
Campaign bag specialist, sample approval briefing
Positioning the reward and planning a re-order
Camera backers are specification-led, so the campaign page should lead with the configuration the bag holds, the foam specification and the access points, and treat colour as a secondary choice. Reward tiers work best as a single hero specification with accessory add-ons rather than as a family of sizes: a rain cover, a padded lens pouch, a tripod strap set and a divider expansion pack all use the same materials and the same production line, so they add margin without adding engineering. Introduce a second size only once the first has funded and shipped.
- Padded lens pouch sized to the kit configuration: roughly 3 to 5 USD landed, 19 to 25 USD as an add-on.
- Tripod or gimbal strap set: roughly 2 to 4 USD landed, 15 USD as an add-on.
- Divider expansion pack with two extra panels: roughly 2 to 3 USD landed, 14 USD as an add-on.
- Rain cover in a hi-visibility colour as a second unit: roughly 2 to 3 USD landed, 15 USD as an add-on.
Plan the re-order early, because the specification is worth more the second time. Holding the approved reference sample, the foam supplier and the divider pattern means a second run matches the first exactly, which matters to photographers who recommend gear to each other. A re-order within six months also improves hardware and fabric lot pricing and spreads any tooling across more units. Order planning is covered on bag manufacturing for campaign creators, and related category thinking is collected on the blog.
Specify your camera pack before you quote it
Send your target gear configuration, volume and access point preference to service@junyuanbags.com. Our production team will return a padding and divider specification, a cost breakdown at 500 and 2,000 pcs, and a 12-15 working day sampling plan with defined fit checks.
Frequently Asked Questions
What padding thickness should a camera backpack use?
Use differential padding: 10 to 12 mm of EVA at the base and lower side walls, 8 to 10 mm at the back panel, and 10 to 15 mm of lighter EPE at the lid. Uniform padding is either too heavy or too thin where it counts. Ask the supplier for density in kg per cubic metre and for compression set data.
Which foam is better for camera bag dividers, EVA or EPE?
EVA is denser, typically 90 to 140 kg per cubic metre, and recovers better after repeated compression, so it suits dividers and structural panels. EPE is lighter at 25 to 45 kg per cubic metre and cheaper, but it takes a compression set, so it suits lid filler and low-load areas.
How much does a divider set add to unit cost?
A set of six padded hook-and-loop panels typically adds 4 to 5 USD per unit at 500 pcs. Origami-fold panels add a further 1 to 2 USD, and a removable padded cube that converts the bag to a daypack adds 6 to 12 USD depending on construction.
What access point is best for a camera backpack?
Rear access is most secure because the opening cannot be reached while the bag is worn, and it typically adds 3.50 to 6.00 USD. Side access is fastest for withdrawing a body one-handed and adds 2.00 to 3.50 USD per side. Most premium campaigns combine rear access with one side opening.
How is the interior capacity of a camera pack specified?
State the equipment configuration rather than litres alone: for example a body with grip plus two lenses and a 14 inch device in a 20 to 26 L pack. Dimension the interior against real bodies and lenses, and test the sample with physical equipment before approving production.
Why does the laptop sleeve need a floating base?
A suspended sleeve stops the device bottoming out against the base seam when the bag is set down with 6 to 9 kg of gear inside. Specify a false bottom of at least 15 mm of foam below the sleeve and a padded separation layer between the sleeve and the gear compartment.
How long does sampling take for a camera backpack?
12-15 working days rather than the standard 6-10, because divider patterning, curved rear zip fitting and the moulded panel to base board junction all need resolution. Plan two rounds, and approve the second in writing with photographs and a retained reference sample before bulk starts.
What is the MOQ for a custom camera backpack?
500 pcs per style and colourway. Because a camera build carries more panels, foam and hardware than a daypack, the 500 pcs unit cost is noticeably higher than at 2,000 pcs, so model both quantities before you set the pledge.
What inspection checks catch camera bag faults?
In addition to AQL 2.5 inspection to ISO 2859-1, measure divider dimensions against the approved sample on 8 pcs, check foam thickness at three points, test the rear zip under full load for binding, and check hook-and-loop peel strength, which is the most common field failure.
Should a camera backpack be described as waterproof?
Only if you have commissioned seam sealing and a defined test, which typically adds 2 to 4 USD per unit on a pack of this size. The defensible claim is water resistant with a coated shell, covered zips and a supplied rain cover, which is what most photographers actually need and what can be supported by a spray test result.
How much does a camera backpack cost to produce?
A representative 24 L build totals roughly 59.70 USD FOB Xiamen at 500 pcs, easing to about 51 to 55 USD at 2,000 pcs. Landed cost after freight and duty is typically 62 to 76 USD, which supports a pledge in the 169 to 199 USD band with healthy contribution.
Does a camera pack need a hip belt?
From roughly 25 L upward, yes. Gear loads of 6 to 9 kg should sit on the hips rather than the shoulders, and a padded hip belt with webbing that continues into the back panel is the cheapest way to achieve that. It typically adds around 1.20 USD in hardware.
What transit test should I specify for a camera pack?
Carton-level testing to ISTA 3A practice is the usual choice, because the gear compartment has to survive a drop in transit as well as in use. Agree the test at quotation stage so carton specification and internal packing are designed to pass it.
People Also Ask
What makes a good camera backpack?
Differential padding with the thickest foam at the base, dividers dimensioned against real bodies with 3 to 5 mm of compression, and an access point that matches how you shoot. Rear access is most secure, side access is fastest, and many premium packs combine both.
Are removable camera inserts worth the extra cost?
Usually yes for a campaign. A removable padded cube adds 6 to 12 USD to unit cost but lets the bag convert to a daypack, which broadens the audience and is a strong conversion argument on a campaign page.
How do I stop gear moving inside a camera bag?
Dimension the divider system against the actual equipment rather than estimating, and require a snug fit with 3 to 5 mm of foam compression. Loose dividers are the most common cause of gear shifting and the most common backer complaint.
Can a camera backpack also carry a laptop?
Yes, but the sleeve must be suspended with a false bottom of at least 15 mm of foam and a padded separation layer from the gear compartment, so a lens barrel cannot press into the lid when the bag is loaded.
Why do camera backpacks cost more than daypacks?
More panels, more foam, up to six zip runs, more hardware and higher labour content from divider assembly. The labour line alone is typically 30 to 40 percent higher than a daypack of the same volume.