Kickstarter Packing Cubes: Why Compression Panels Drive Add-On Sales
Compression panels sell cubes because the benefit is visible in one frame. A compression cube uses a second zip running around the body that closes the panel and expels air, typically reducing packed volume by 20 to 35 per cent, and that reduction photographs as a before and after that a backer understands instantly. A second zip adds roughly 15 to 30 per cent to the cube unit cost, and it converts materially better than a plain cube. Minimum 500 pcs per style and colourway, sampling 6 to 10 working days, bulk 35 to 50 days, inspection AQL 2.5 to ISO 2859-1.
- What a compression panel actually does
- Why compression demos convert on a campaign page
- The two-zip architecture and what it costs
- Panel geometry and where compression fails
- Fabric and mesh choice for a compression cube
- Specifying the compression ratio honestly
- Sampling and testing a compression cube
- Pricing the compression upgrade
- Add-on mechanics: how to present the upgrade
- MOQ and colourway for a compression cube line
- Inspection points for compression cubes
What a compression panel actually does
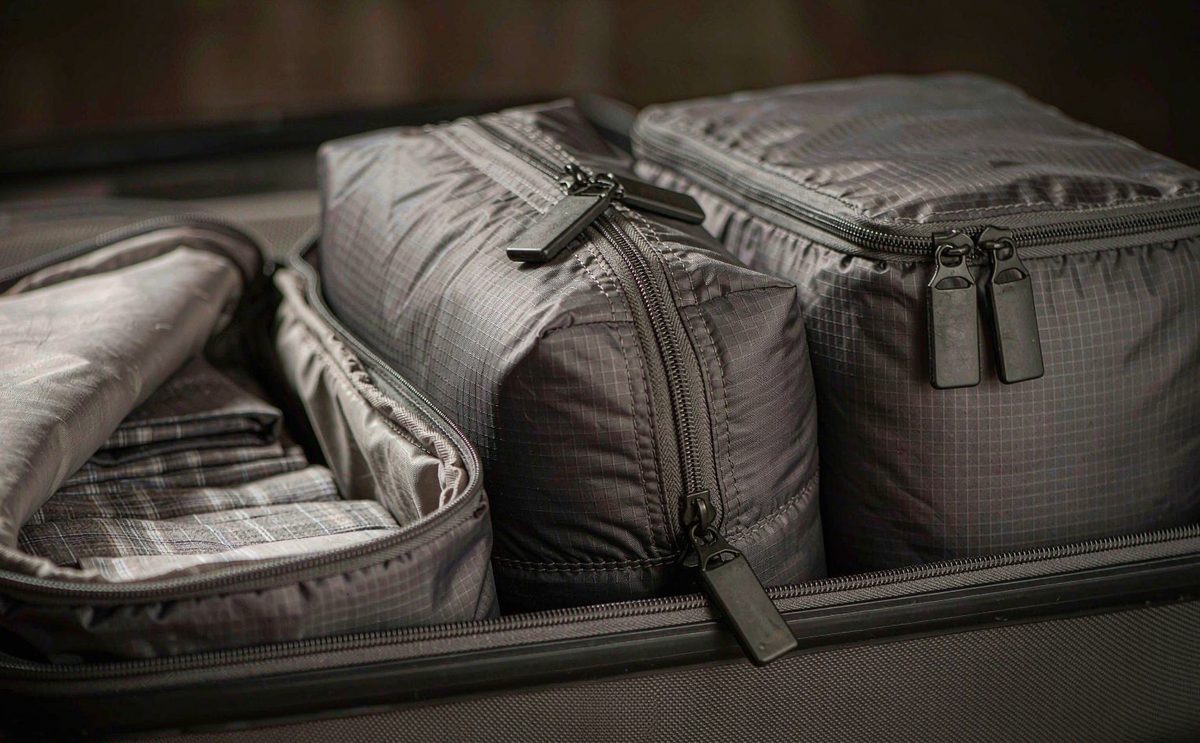
A packing cube organises. A compression packing cube does something more useful: it removes air. The construction is a cube with a second zip that runs around the body, usually parallel to the main opening and set into a gusset. Closing that second zip draws the panel in, compresses the contents against the panel and expels air through the mesh or through the zip line. The result is a cube that occupies less volume than the same contents packed loosely.
The mechanism matters because most of the bulk in a packed bag is not clothing, it is air trapped between folds. That is why rolling and folding techniques work at all, and it is why a mechanical compression that a backer can apply by pulling a zip outperforms a technique they have to remember. The typical reduction on a cube packed with soft garments is 20 to 35 per cent of packed volume, and it is higher on knitwear and lower on dense items like shoes or toiletries.
There is a second benefit that is easier to overlook and that backers mention often: compression stabilises the contents. A loosely packed cube slumps and shifts in transit, and garments arrive creased. A compressed cube holds its contents in place, so garments arrive in the state they were packed in, and a stack of compressed cubes behaves like a block rather than like a pile. Both effects are felt on every trip rather than appreciated once. Our custom travel bags for Kickstarter pillar page sets the travel category context for creators building a full set, and our custom bags for Kickstarter page covers how an accessory like this sits alongside the other reward formats in a programme.
Key takeaways on compression cubes
- Compression removes air, typically reducing packed volume by 20 to 35 per cent on soft garments.
- A second zip adds roughly 15 to 30 per cent to the cube unit cost and converts materially better than a plain cube.
- Panel geometry decides whether compression works: the panel must be able to move, not just be tightened.
- Specify the compression ratio as a tested figure on a defined load, never as a claim without a method.
- Compression is the cube feature most worth the upgrade cost, because it demos in a single before and after frame.
- Minimum order quantity
- 500 pcs per style and per colourway
- Three-cube set commitment
- 1,500 pcs in one colourway
- Sampling
- 6-10 working days (12-15 for complex builds)
- Bulk production
- 35-50 days after deposit and approved pre-production sample
- Inspection
- AQL 2.5 to ISO 2859-1
- Trade term
- FOB Xiamen
- Payment
- T/T 30/70
- Compression volume reduction
- 20-35% on soft garments
- Second zip cost effect
- +15-30% per cube
- Monthly capacity
- 200,000 pcs per month
Why compression demos convert on a campaign page
Campaign pages are won in single frames. A feature that can be understood from one still image outperforms a feature that needs three paragraphs, and compression is close to ideal in that respect: two photographs of the same garments, one before the second zip and one after, communicate the entire benefit without a word of copy. That is why compression cubes appear in campaign videos more often than any other packing accessory.
The underlying reason is that compression converts an abstract promise into a measurable one. Organisation is abstract: a backer knows a cube will organise but cannot evaluate how well. Compression is measurable: the cube is smaller, and the difference is visible. Backers reward measurability because it reduces the risk of buying something that turns out to be a bag within a bag.
- One-frame benefit: a before and after pair communicates the feature instantly, in a thumbnail and in a feed.
- Measurable outcome: a percentage reduction is a claim the backer can verify on arrival, which lowers perceived purchase risk.
- Repeat experience: the benefit is felt every trip rather than once, which drives the review sentiment that feeds the next campaign.
- Photogenic prop: a compressed cube looks deliberate and tidy in a packed-bag shot, which improves the rest of the page's photography.
- Upgrade logic: compression justifies a price step in a way that a fabric upgrade or a colour option does not.
There is a practical instruction that follows from this: shoot the demo with real garments, not with a styled filler. A cube compressed around a single folded towel demonstrates nothing, because the reduction is invisible. A cube packed with four days of clothing demonstrates the actual benefit, and the difference in the frame is large enough to read at thumbnail size. Budget the photography session for that shot specifically, because it is likely to be the highest-performing image on the page.
The two-zip architecture and what it costs
The standard construction is two zips: a main opening zip that gives access to the contents, and a compression zip that runs around the body and draws the panel in. Some designs use one zip with a second slider, and some use a strap and buckle arrangement instead of a zip. The two-zip construction is the most reliable and the most common, and it is the one this article costs out.
| Architecture | Construction | Cost effect | Assessment |
|---|---|---|---|
| Two zips | Main access zip plus a compression zip in the gusset | +15-30% | Standard; most reliable |
| One zip, two sliders | A single long track with two sliders | +8-15% | Cheaper; harder to use, confuses backers |
| Strap and buckle | Webbing straps with side-release buckles | +6-12% | Cheapest; less even compression |
| Drawcord panel | A cord and lock gathering the panel | +5-10% | Light duty only |
| Panel with an internal flap | A flap folding over the contents before closing | +4-8% | Marginal effect; not true compression |
The cost is concentrated in the second zip and in the labour of setting it into a gusset rather than into a flat panel. Setting a zip into a three-dimensional gusset is a slower operation than setting one into a flat face, and the seam allowance and the tape handling need to be specified. That labour line, not the component, is the larger share of the 15 to 30 per cent, which is worth knowing when negotiating: a cheaper zip will not reduce the upgrade much.
Two specification points decide whether the second zip works well. The first is slider type: an auto-lock slider on the compression zip is essential, because that zip is under constant load once closed and a non-locking slider will creep back open. The second is the puller: a compression zip is pulled hard and repeatedly, so a webbing loop puller that tears is a common complaint, and a moulded or wrapped puller is worth the small premium.
Panel geometry and where compression fails
Compression fails in three predictable ways, and all three are geometry problems rather than material problems. The first is a panel that cannot move: if the compression zip is set into a panel that is already at its limit, closing it tightens the fabric without compressing the contents, and the cube gets harder rather than smaller. The second is uneven compression: a panel that draws in at one end produces a wedge rather than a block. The third is zip jamming at the corner where the compression track turns.
- Give the panel slack to move: the compression zip should draw in a gusset, not tension a flat face.
- Run the compression zip around the whole body rather than across one face, so the reduction is even.
- Radius the corners of the compression track generously; a tight radius is where the slider jams.
- Specify an auto-lock slider on the compression zip, since that zip is under constant load when closed.
- Add a fabric stop or garage at both ends of the compression track.
- Test with the contents the backer will actually pack, not with a soft filler.
The test that exposes all three failures is simple and takes five minutes. Pack the cube with a realistic load, four days of clothing rather than a towel, close the main zip, close the compression zip, and measure the height before and after. Then open and close the compression zip twenty times and check for jamming at the corners, and leave the cube compressed for an hour and check whether the slider has crept. A cube that fails any of those three will generate complaints regardless of how it photographs.
One dimension deserves a specific note: cube height. A compression cube needs enough height for the reduction to be visible. On a shallow cube of 5 cm the reduction is a centimetre or two and looks trivial; on a cube of 9 to 12 cm the reduction is dramatic and photographs well. If the campaign is choosing between a flat cube and a deep cube for the compression feature, choose the deeper one, because the feature sells on visible effect.
Fabric and mesh choice for a compression cube
A compression cube is harder on its materials than a plain cube, because the panel and the seams are under load every time the zip is closed. The fabric needs to resist that load without stretching permanently, and the mesh needs to let air out without tearing at the seam where it meets the compression panel.
| Element | Recommended | Why | Avoid |
|---|---|---|---|
| Shell fabric | 70D or 105D ripstop nylon | Low stretch, light, resists repeated compression | 210D polyester, which is heavier and less compressible |
| Mesh panel | Fine no-seeum mesh, bonded at the seam | Vents air without snagging | Coarse mesh, which snags and tears |
| Compression zip | Number 4 or 5 coil, auto-lock slider | Holds under constant load | Non-locking slider, which creeps open |
| Puller | Moulded or wrapped pull | Withstands hard repeated pulling | Light webbing loop, which tears |
| Seam finish | Bound or turned internal seams | Resists load at the panel join | Raw internal edges |
| Gusset | Same shell fabric, reinforced at the zip | Panel must move without stretching | Lining fabric in the gusset |
The fabric weight trade-off is worth stating explicitly. A lighter fabric compresses better because it adds less of its own bulk, but it stretches more under repeated load. A heavier fabric holds its shape but resists compression. The 70D to 105D ripstop band is where those two pressures balance for a travel cube, and it is the band most compression cubes on the market sit in for that reason.
Mesh placement matters more on a compression cube than on a plain one, because the air has somewhere to go. A mesh panel on one face allows air to escape as the panel draws in, which is what makes the compression effective; a fully closed cube in coated fabric traps the air and the zip becomes hard to close. Specify the mesh on a face rather than on the gusset, and size it generously enough to vent.
Specifying the compression ratio honestly
The compression ratio is the number the campaign will want to publish, and it is the number most easily overstated. A reduction of 20 to 35 per cent is the realistic band for soft garments packed in a cube with a functioning compression panel. Claims above 50 per cent usually come from measuring a loosely packed cube against a tightly compressed one, which is a comparison of packing effort rather than of the product.
- Define the load: state what was packed. Knitwear compresses more than denim and far more than shoes.
- Define the starting condition: a reasonably packed cube, not a deliberately loose one.
- Measure height, not volume, and state the cube size the figure was measured on.
- Publish the band rather than a single number, for example 20-35 per cent on soft garments.
- Keep the test photographs, because a published figure invites verification by the backer.
There is a reason to be conservative beyond honesty. A backer who achieves 25 per cent when the page said 30 per cent is satisfied; a backer who achieves 25 per cent when the page said 50 per cent feels misled and says so publicly. The compression feature is strong enough on its real numbers that overstating it is unnecessary, and the review sentiment generated by the first wave of deliveries feeds the second campaign.
Where the campaign wants a figure it can defend precisely, run the test on the approved production sample with a documented load and keep the record. That is a half-hour exercise with a tape measure and a camera, and it produces both the number and the image, which are the two things the page needs. Where a laboratory figure is wanted, ask at sampling stage rather than after the campaign closes.
Sampling and testing a compression cube
Sampling runs 6 to 10 working days for a standard build and 12 to 15 for a complex one, and a compression cube sits at the standard end. The sample should be the largest size in the set, because the compression geometry is hardest to get right at scale and because the largest cube is the one the campaign will photograph. Approve it as the reference unit and apply the same construction to the smaller sizes.
- Pack the sample with a realistic load of soft garments and measure the height before compression.
- Close the compression zip and measure again; record the percentage reduction.
- Cycle the compression zip 20 times and check for jamming at the corners.
- Leave the cube compressed for one hour and check whether the auto-lock slider has crept.
- Inspect the mesh-to-panel seam for tearing or distortion after cycling.
- Check the internal seam finish, since a raw edge inside a cube is the most visible quality signal.
- Confirm the nesting sequence with the other cubes in the set and record it as the packing specification.
- Return one numbered revision list, each item naming a component and a required change.
The cycling test is the one that separates a sample that works on the bench from one that works after a season. A compression zip is the hardest-worked component in the whole travel set: it is pulled under load, repeatedly, in both directions, often at an angle. Twenty cycles at sampling is a modest proxy for a year of trips, and a sample that jams at cycle eight will jam for the backer on the first trip.
One more sample-stage check is worth building in, because it affects the reward as delivered: fit. Place the full set, compressed, inside the hero bag and close it. A compressed cube is a different shape from an uncompressed one, and a set that nests perfectly uncompressed can fight the corners once every cube has been tightened. Further approval discipline is set out on our crowdfunding bag sample prototyping page.
Pricing the compression upgrade
The compression upgrade costs 15 to 30 per cent more per cube than a plain cube, and the question is what it returns. The return comes through two channels: a higher add-on price for the cube set, and a higher conversion rate on that add-on. Both are worth modelling separately, because they behave differently.
| Line | Plain cube set | Compression cube set | Delta |
|---|---|---|---|
| FOB unit cost per set | 4-8 USD | 6-11 USD | +30-45% |
| Add-on price supported | 25-32 USD | 35-45 USD | +35-45% |
| Conversion assumption | 20-35% | 25-45% | Higher on a demonstrable feature |
| Contribution per unit sold | 19-24 USD | 26-33 USD | +7-11 USD |
| Freight effect | Baseline | Lower per set if compressed | Small positive |
The case is strongest when the upgrade is presented as a choice rather than as a replacement. Offering a plain set and a compression set at two price points lets the market reveal its preference, costs nothing extra in tooling, and captures both the price-sensitive and the feature-driven backer. It does mean two styles per size, which doubles the style count, so the alternative is to offer compression on the large cube only, where the effect is most visible.
There is a freight benefit worth counting. A compressed cube set occupies less volume in the carton, and if the campaign ships the sets compressed and nested, the cube volume in the shipment falls. On a 1,500 set order that is a modest but real line, and it partially offsets the upgrade cost. Our article on packing cube sets as an AOV lever models the full add-on arithmetic, including the commitment matrix and a worked AOV model.
Add-on mechanics: how to present the upgrade
How the upgrade appears on the page matters as much as whether it exists. Three placements work, and they are not mutually exclusive. The first is as a standalone add-on at a stated price, visible from day one. The second is as a tier upgrade, where the mid tier contains a plain set and the top tier contains a compression set. The third is as a stretch goal, where the compression upgrade is unlocked for all backers at a funding threshold.
- Standalone add-on: price it at 15 to 30 per cent of the core pledge and show the before and after image beside it.
- Tier upgrade: make the compression set the top tier and state the difference in one line, not one paragraph.
- Stretch goal: unlocking compression for everyone at a threshold near 120 per cent of goal is a strong mid-campaign event.
- Bundle with the hero bag: a carry-on shipped with a compression set inside it is a complete story in one photograph.
- Limited first run: a stated cap on compression sets in the first wave is credible because the style has its own minimum.
The placement that works least well is burying compression in a feature list. A backer scrolling past eight bullet points will not register the one feature that would have sold them; a backer shown a single before and after image will. Give compression its own block on the page with its own image, and let the other features sit in the list.
One operational point ties the marketing to the production plan. If compression is offered as a stretch goal, the cubes need to be booked before the goal is hit, because materials are purchased against a booking and a booking made after the fact pushes the production window out. Book the compression set as the assumed configuration and treat the plain set as the fallback, rather than the other way round.
MOQ and colourway for a compression cube line
The minimum is 500 pcs per style and per colourway, and every cube size is a style. A three-cube compression set is three styles and 1,500 pcs in one colourway. Adding a plain version of the same three sizes doubles that to six styles and 3,000 pcs, which is a retail-scale commitment and one most first campaigns should not make.
| Configuration | Styles | Total pcs, one colourway | Assessment |
|---|---|---|---|
| One compression cube, large only | 1 | 500 pcs | Lowest-risk test of the feature |
| Three-cube compression set | 3 | 1,500 pcs | Standard; recommended |
| Three compression plus one shoe cube | 4 | 2,000 pcs | Strong set for adventure audiences |
| Three compression, two colourways | 6 | 3,000 pcs | Retail-scale commitment |
| Compression and plain versions | 6 | 3,000 pcs | Only with a pre-order signal |
The recommended structure for a first campaign is a single three-cube compression set in one colourway, with a re-order option agreed in writing and a hold on a second colourway until the first wave sells. That keeps the commitment at 1,500 pcs while preserving the ability to capture demand, and it avoids the worst outcome in this category, which is several hundred cubes in a colour that did not sell.
Where the campaign wants a second colourway on the page, the cheaper route is to offer one colourway and use the post-funding survey to allocate a second within the same 1,500 pcs commitment. That gives backers a choice without doubling the material purchase, and it is the structure our production team recommends most often for cube programmes. Our low minimum bag production page explains how these split commitments work in practice.
Inspection points for compression cubes
Inspection runs at AQL 2.5 to ISO 2859-1 with a sub-lot per size, and a compression cube needs three checks added to the standard cube defect class list. All three concern the second zip, because that is the component the upgrade exists for and the one that fails.
- Auto-lock slider present on the compression zip on every unit drawn; a non-locking slider is a critical defect, not a minor one.
- Compression track continuity around the whole body, with a stop or garage at both ends.
- Corner radius free of jamming: cycle the compression zip on every unit drawn, not only on a sample.
- Mesh-to-panel seam integrity after cycling, with no tearing or distortion.
- Main zip action and slider type, checked against the approved reference unit.
- Piece count and nesting sequence in the kit, checked at the packing station.
The instruction to cycle the compression zip on every unit drawn sounds excessive and is not. It takes about eight seconds per unit, and it is the only check that finds a jam before the backer does. A jam that appears in 3 per cent of units is invisible in a sample-size draw of appearance checks and obvious in a functional check, which is why functional checks belong in the defect class list rather than in a separate process.
Require the report to be issued to you before the 70 per cent balance is released, and photograph any defect found. With payment at T/T 30/70, the 30 per cent deposit falls due on written approval of the pre-production sample and the 70 per cent balance falls due after a passed inspection and before cargo release at FOB Xiamen. That structure is what gives the inspection force. Our Kickstarter campaign bag QA and QC page lists the defect classes we log and the evidence pack issued with a report.
If you are planning a cube set for a travel campaign, send the specification to request a quotation with your target delivery month and you will receive a per-size unit cost for both the plain and the compression construction, a sampling estimate and a booked 35 to 50 day production window. Our production team works from 4,950 m² of SGS-verified floor with 137 staff across 7 lines and 149 machines, running 200,000 pcs per month, and has supported 20+ crowdfunding campaigns since 2014.
Quote both cube constructions before you choose
Send us the size list, the material set and whether you want compression on all sizes or the large only. As your campaign bag specialist we will return a per-size unit cost for both constructions, a sampling plan and a booked production window.
Frequently Asked Questions
How much volume does a compression packing cube actually save?
Typically 20 to 35 per cent of packed volume on soft garments, measured as height reduction on a reasonably packed cube. It is higher on knitwear and lower on dense items like shoes or toiletries. Claims above 50 per cent usually compare a loosely packed cube with a tightly compressed one.
How much more does a compression cube cost to make?
Roughly 15 to 30 per cent more per cube than a plain cube. The larger share of that is the labour of setting a second zip into a three-dimensional gusset rather than the component itself, so specifying a cheaper zip will not reduce the upgrade much.
What zip should a compression cube use?
A number 4 or number 5 coil zip with an auto-lock slider and a moulded or wrapped puller. The auto-lock slider is essential because the compression zip is under constant load once closed, and a non-locking slider will creep back open.
Why does my compression zip jam?
Usually at the corner radius. Compression tracks that turn tightly at the corner jam the slider, especially under load. Radius the corners generously, run the track around the whole body so compression is even, and cycle the zip twenty times during sampling to find it.
What fabric should a compression cube use?
70D or 105D ripstop nylon for the shell, with a fine no-seeum mesh panel on a face rather than on the gusset. Lighter fabric compresses better but stretches more; heavier fabric holds shape but resists compression. That band balances the two.
Where should the mesh panel go on a compression cube?
On a face, not on the gusset, and sized generously enough to vent. The air has to escape as the panel draws in; a fully closed cube in coated fabric traps air and makes the compression zip hard to close.
What is the minimum order quantity for a compression cube set?
500 pcs per style and per colourway, and each size is a style. A three-cube compression set is 1,500 pcs in one colourway. Offering both a compression and a plain version of three sizes is six styles and 3,000 pcs.
Should compression be on every cube in the set?
Not necessarily. Compression is most visible on the large cube, where the reduction is dramatic, and least useful on a small cube under 5 cm deep. Compressing the large cube only is a lower-cost route to the same marketing benefit.
How long does sampling take for a compression cube?
6 to 10 working days, since a compression cube sits at the standard end of the window. Sample the largest size, because the compression geometry is hardest to get right at scale and because that is the cube the campaign will photograph.
How should I present compression on the campaign page?
Give it its own block with a before and after image, rather than a line in a feature list. Consider offering it as a standalone add-on, as a top-tier upgrade, or as a stretch goal unlocked near 120 per cent of goal.
What inspection checks does a compression cube need?
Three beyond the standard cube list: an auto-lock slider present on every unit drawn, track continuity with stops at both ends, and a functional cycle of the compression zip on every unit drawn to find corner jamming. Cycling takes about eight seconds per unit.
When are payments due on a cube set order?
Payment is T/T 30/70. The 30 per cent deposit falls due on written approval of the pre-production sample and releases materials and the production slot. The 70 per cent balance falls due after a passed inspection and before cargo release at FOB Xiamen.
People Also Ask
Are compression packing cubes worth the extra cost?
Yes, for most travel campaigns. The second zip adds 15 to 30 per cent to the cube unit cost, and the feature supports an add-on price 35 to 45 per cent higher plus a better conversion rate, because the benefit is visible in one image.
What is the difference between a packing cube and a compression cube?
A packing cube organises; a compression cube also removes air. It has a second zip running around the body that draws a gusset in and expels air, typically reducing packed volume by 20 to 35 per cent on soft garments.
How do I test whether a compression cube works?
Pack it with a realistic load of soft garments, measure the height, close the compression zip and measure again. Cycle the zip twenty times to check for corner jamming, and leave it compressed for an hour to check the slider has not crept.
Why is my compression cube not getting smaller?
The panel probably cannot move. If the compression zip is set into a flat face rather than a gusset, closing it tension the fabric without compressing the contents. Check also whether the cube is too shallow for the reduction to be visible.
Can I put compression on one cube instead of all three?
Yes, and it is a sensible cost route. Compression is most visible on the large cube, so a set with one compression cube and two plain cubes captures most of the marketing benefit at a fraction of the upgrade cost.
Do compression cubes need a mesh panel?
They need somewhere for the air to go. A mesh panel on a face vents air as the panel draws in; without one the cube traps air and the compression zip becomes hard to close. Put the mesh on a face, not the gusset.
Should I offer compression as a stretch goal?
It makes a strong mid-campaign event at a threshold near 120 per cent of goal. Book the compression set as the assumed configuration before the campaign opens, because materials are purchased against a booking and a late booking pushes the production window out.