Kickstarter Camera Bags: A Creator Niche With High Reward Values
Camera bags sit at the top of the crowdfunding reward value table because the audience already owns fragile, expensive equipment and treats protection as a considered purchase rather than a gift. A camera bag reward tier commonly sits between 79 and 189 USD, carries a specification backers can compare line by line, and photographs well in a campaign video. At MOQ 500 pcs per style and colourway, sampling 6-10 working days and production 35-50 days, the category rewards creators who write the compartment and divider specification before they commission the render.
- Why camera bags sit at the top of the reward value table
- Who backs a camera bag campaign, and what they compare
- Reward tier architecture: three price points that work
- Divider count versus pledge value: where the money shows
- Access geometry: top, side and back entry
- Capacity claims that survive contact with a real kit
- Fabric, padding and weather protection for field use
- Tripod carry, harness and the load a photographer carries
- Cost structure of a camera bag at 500 pcs
- Sampling and inspection for a camera bag run
- Positioning the tier on the campaign page
Why camera bags sit at the top of the reward value table
Camera bags behave differently from almost every other bag category on a crowdfunding page, and the reason is straightforward: the backer already owns something fragile and expensive that needs carrying. A photographer with a mirrorless body and two lenses has 1,500 to 4,000 USD of equipment sitting on the desk beside them, and a bag that protects it is a rational purchase rather than an impulse. That is why camera bag rewards routinely sit at 79 to 189 USD while a printed tote reward sits at 25 to 45 USD, and why conversion on the tier is often stronger despite a longer consideration time.
Three structural features produce that value. First, the purchase is repeatable: bodies and lenses turn over every three to five years and the bag turns over with them. Second, the category has a precise specification language, so a campaign can say something verifiable about dividers, access geometry and load instead of relying on adjectives. Third, photography communities review gear publicly and in detail, so a well-specified bag earns organic distribution that a generic lifestyle bag does not. Together those three features turn a bag into a considered purchase at a defensible price.
The same precision becomes a trap for the unprepared. This audience reads internal dimensions before it reads copy, and it will ask which body-and-lens combination actually fits. A campaign page that says fits most DSLR and mirrorless kits without a dimension table attracts questions during the campaign, refund requests during fulfilment, and a comment thread that eventually outranks the page itself. The specification work has to happen before the render is commissioned, not after the funding target is met, and it begins with the divider system.
Who backs a camera bag campaign, and what they compare
Four audience segments make up most of the pledge volume in this niche. Enthusiast mirrorless shooters carry one body with two or three primes and want a small, fast bag. Hybrid shooters carry a body, a lens and a small rig plus a microphone and cables, and care about organisation more than about silhouette. Travel photographers want a bag that carries a kit on the plane and does not look like a camera bag on the street. Drone owners increasingly sit in the same audience, and if your campaign serves them, the custom drone bags for crowdfunding breakdown covers how that kit changes the compartment layout.
Across all four segments the comparison list is remarkably consistent. Backers check internal dimensions in millimetres, the number of dividers supplied, whether the bag can be opened without putting it down, whether a tripod attaches, whether a 14-inch laptop fits alongside the kit, and what the bag weighs empty. Notice that five of those six items are measurable. A campaign that publishes them converts better than one that publishes adjectives, because the backer can complete the comparison without waiting for an answer in the comments.
Pledge distribution in this niche also skews upward. In a typical bag campaign the top two tiers collect roughly 55 to 70 percent of total funding; in a camera bag campaign the skew is usually stronger, because the mid tier is where the actual product lives and the entry tier is often a strap or a pouch rather than the bag. That has a direct production consequence: plan the 500-pcs run against the tier you expect to sell, not against the tier you hope to sell. Our sourcing hub for custom bags for Kickstarter sets out how quantity planning works across categories before a quote is requested.
Reward tier architecture: three price points that work
A camera bag campaign generally needs three physical tiers rather than five. Too many tiers fragment the production run across colourways and sizes, and since MOQ is 500 pcs per style and per colourway, every additional variant is another 500-unit commitment. A clean three-tier structure keeps the run concentrated and the bill of materials stable, which is what keeps the unit cost inside the band the campaign was priced against.
| Tier | Typical contents | Indicative pledge band | Production note |
|---|---|---|---|
| Entry: accessory pouch or strap | Lens pouch, strap or small organiser with the campaign logo | 29-49 USD | Cheapest entry point; keeps the 500-pcs run for the main bag intact |
| Core: the camera bag | Main bag with 4-6 dividers, rain cover, tripod straps | 99-159 USD | The tier to plan volume against; usually 55-70% of funding |
| Premium: bag plus insert set | Main bag, second divider set, cable organiser, branded pouch | 179-259 USD | Uses the same base bag; adds low-cost components at high margin |
| Stretch-goal variant | Second colourway or a larger size of the same bag | Same as core | Only unlock after the base 500-pcs commitment is covered |
The premium tier is where margin is made. It uses the same 500-pcs base bag, which means no new tooling and no new fabric lot, and it adds components that are individually cheap and collectively persuasive. A second divider set, a cable organiser and a branded lens pouch might add 6 to 11 USD in landed cost while supporting a pledge increase of 60 to 90 USD. That is the single most reliable pricing move available in this niche, and it is available precisely because the base specification is already paid for.
Early-bird pricing deserves a caution. Discounting the core tier by 25 to 30 percent to seed the first 48 hours is normal, but the discounted price still has to clear landed cost including freight, platform fees and the sampling charge amortised across the run. If the early-bird price is below landed cost, every additional early-bird pledge makes the campaign worse rather than better, and the shortfall reappears when stretch goals add variants.
One structural caution applies to the entry tier. If the entry reward is a bag in its own right rather than an accessory, it competes with the core tier rather than leading into it, and pledges that would have landed at 129 USD land at 59 USD instead. Keep the entry reward an accessory and the tier ladder does its job.
Divider count versus pledge value: where the money shows
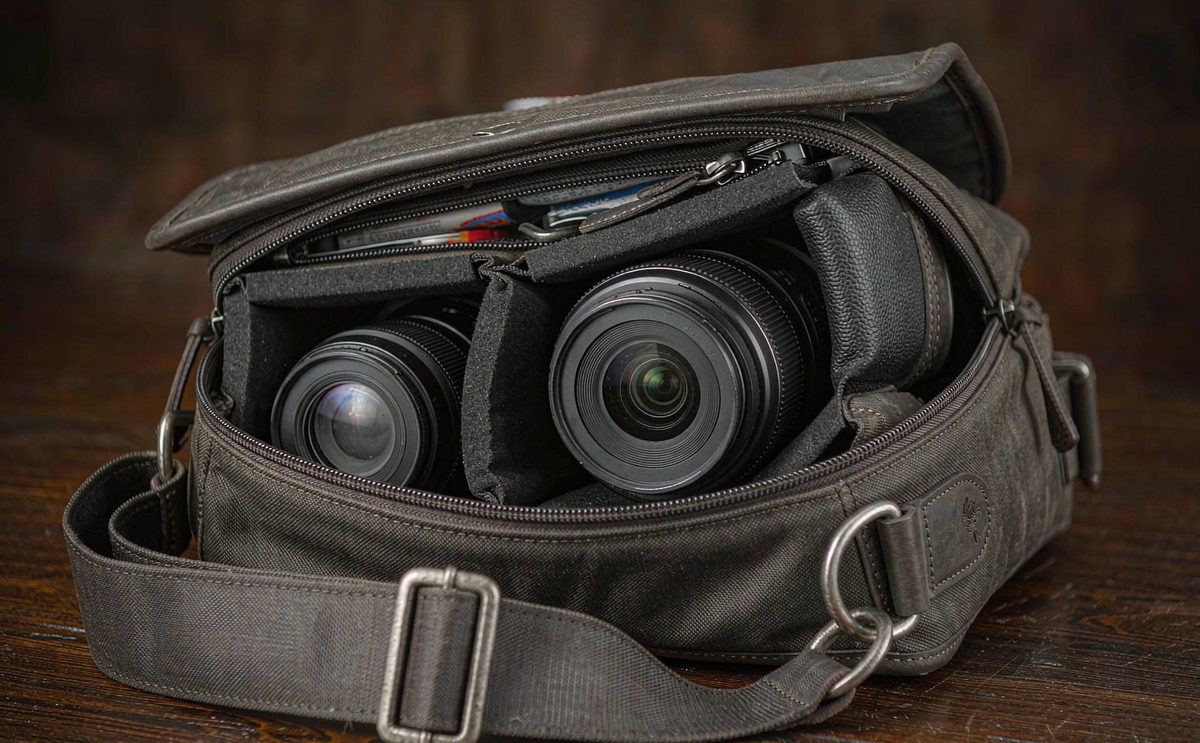
On a camera bag the divider set is not an accessory, it is the product. It is also one of the few specification lines where the cost curve and the perceived-value curve genuinely align: dividers are visible, countable, and directly determine whether a specific kit fits. Backers count them in the photographs. That makes divider specification the highest-leverage decision in the bill of materials after the shell fabric.
- Divider count. Four to six is the working range for a 9-14 L camera bag; below three the kit rattles, above seven the bag becomes an organiser with no room for the camera.
- Padding thickness. 8-12 mm of closed-cell foam laminated to a brushed lining, because dividers carry load between compartments as well as protecting lenses.
- Attachment. Hook-and-loop on both faces so a divider can be repositioned or removed entirely; stitched-in dividers are cheaper and destroy the configuration flexibility backers want.
- Height relative to the interior. Dividers should sit within 5-8 mm of the interior height, or equipment slides over the top in transit.
- Fold geometry. A folding flap at the divider end lets a backer build a taller channel for a 70-200 mm lens without a second part.
Cost-wise, each additional divider adds a cut panel, a laminated foam core, hook-and-loop tape on two faces and roughly one minute of assembly. At 500 pcs the incremental unit cost of one extra divider is small in absolute terms, but multiplied across six dividers and 500 units it is a real line in the quotation. Ask for the divider set as a separately priced item so the trade-off between four, five and six dividers can be made with a number rather than a guess.
One failure mode is worth naming. A divider set that is sized to the interior rather than to the equipment produces a bag that technically holds the kit and practically does not, because the channels are too narrow for a lens with a hood reversed or a body with a grip. Specify the divider set against a named kit configuration, write that configuration into the RFQ, and have the sample tested with the actual equipment rather than with a block of foam of equivalent volume.
Access geometry: top, side and back entry
Access geometry is the second specification photographers evaluate, and it is where camera bags genuinely diverge from general-purpose bags. A top-loading bag has to be put down to be opened. A side-access bag can be swung around on one strap and opened while standing, which is the difference between catching a shot and missing it. That single functional difference is worth more in the campaign video than any material upgrade.
Back-panel access is the third option and serves a different need: security. A bag that opens from the panel that sits against the wearer's back cannot be opened by someone else while it is being worn, which matters for travel and street work. The cost of back access is a more complex panel build and, usually, a slightly stiffer structure, because the opening panel still has to carry harness load. It typically adds 3 to 6 percent to unit cost and no measurable time to the sampling window if it is decided before round one.
- Side access. Best for working shooters; requires a structured side panel and a zip running around three sides, which raises labour slightly.
- Top access. Cheapest to build and the most weather-resistant; acceptable for a travel bag where the camera is not being drawn constantly.
- Back access. Best for travel and theft-conscious use; adds panel complexity and requires the harness to be attached to a separate frame panel.
- Full clamshell. Opens the entire front; excellent for packing at home, slower on the street, and the most expensive closure to build.
Whatever the geometry, the closure has to be a specification rather than a sketch note. State the zip gauge, whether it is reverse-coil, whether there is a storm flap or a garage, and whether the opening can be operated with one hand. One-handed operation is the detail that separates a working camera bag from a bag with a camera compartment, and it is a decision made at the pattern stage rather than at the sample stage.
Capacity claims that survive contact with a real kit
Capacity claims are the most common source of post-campaign disputes in this niche. Fits a body plus three lenses is a claim about a configuration, not about a volume, and two backers will read it against two different kits. The fix is cheap: publish a configuration table with named equipment and the internal dimensions that make it possible, and then build the sample to that table.
| Kit configuration | Typical internal volume | Working internal dimensions | Who it serves |
|---|---|---|---|
| 1 mirrorless body + 2 primes | 6-8 L | Roughly 230 x 150 x 120 mm | Enthusiast and street shooters |
| 1 body + 3 lenses (one zoom) | 9-12 L | Roughly 260 x 170 x 130 mm | The most common core-tier target |
| 1 body + 24-70 + 70-200 + accessories | 13-17 L | Roughly 300 x 190 x 150 mm | Working and event shooters |
| 2 bodies + 3 lenses + 14-inch laptop | 18-24 L | Roughly 330 x 210 x 160 mm | Travel and hybrid shooters |
| Body + lens + drone kit | 12-16 L | Depends on folded aircraft | Cross-over audience; measure the folded aircraft |
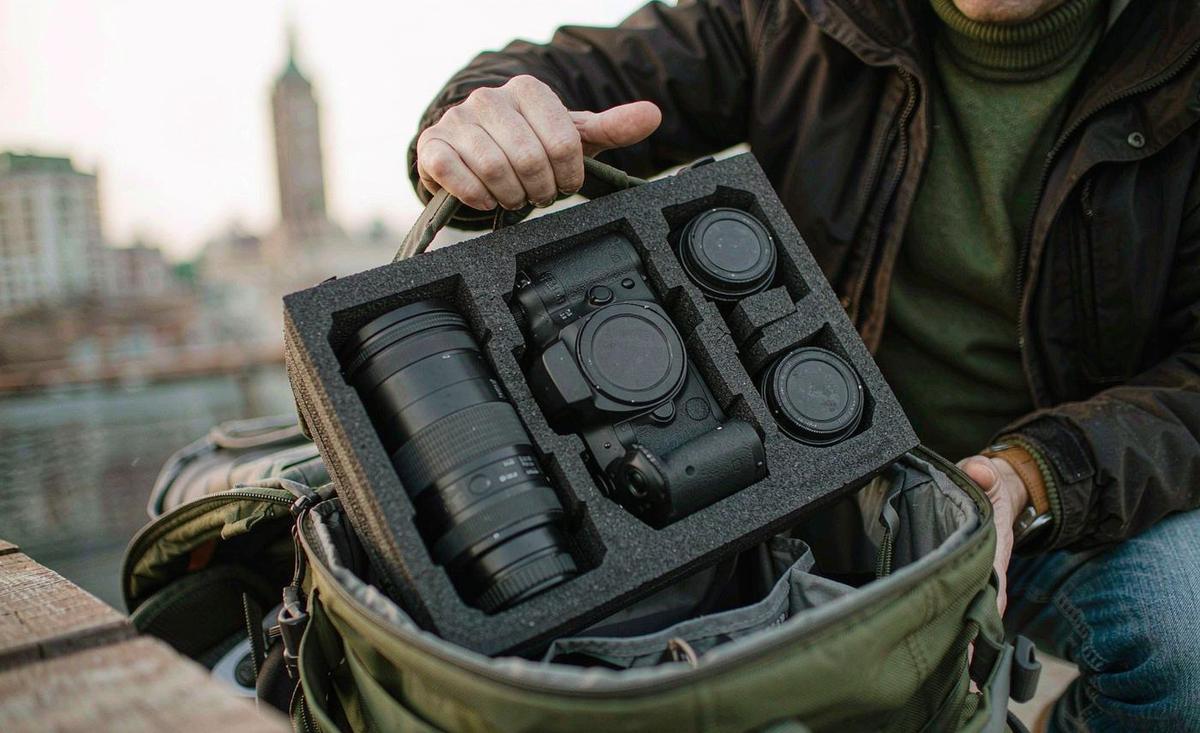
Depth is the dimension campaigns under-specify. A body with a battery grip is 20 to 30 mm taller than the same body without one, and a lens with the hood reversed is 30 to 50 mm longer than the lens alone. If the published fit assumes a bare body and bare lenses, a large share of the audience will find the bag 20 mm short in one dimension and will say so publicly. State whether the configuration table refers to bare or gripped bodies and hooded or reversed-hood lenses.
There is also a commercial reason to get this right early. Volume drives both fabric consumption and freight, and a bag that grows 15 mm in every dimension to accommodate a configuration discovered in the second sampling round will arrive with a unit cost several percent above the figure the campaign was priced on. Write the configuration table first, then size the bag to it, and the quotation will hold.
Finally, publish a statement of what does not fit. Naming the largest configuration the bag will not accept removes ambiguity for the backer who is considering a larger body and prevents the most common version of the fit complaint, which is not that the bag failed but that the backer hoped it would stretch.
Fabric, padding and weather protection for field use
A camera bag is used outdoors, put down on wet ground and loaded with more weight than its size suggests, so the material specification is judged on abrasion and weather rather than on hand feel. A 600D or 900D polyester with a PU coating is the common working choice, with a hydrostatic head figure to ISO 811 or AATCC 127 somewhere between 1,000 and 5,000 mm. Higher denier adds abrasion resistance at a modest cost increase and a small weight penalty.
- Shell. 600D or 900D polyester or nylon with PU or TPU coating and a stated hydrostatic head figure.
- Base panel. A heavier denier or a coated base with feet, because the base is set down on wet ground and takes the abrasion.
- Padding. 8-12 mm closed-cell foam on all six faces of the camera compartment, not just on the base.
- Lining. A brushed or low-lint lining in a light colour, so a dark interior does not hide a dropped lens cap.
- Rain cover. A separate taped-seam cover in a dedicated pocket; cheaper and more effective than trying to make the whole bag waterproof.
The rain cover is the single best value addition in this category. It delivers the weather claim a photographer actually needs, it is a separate low-cost item with its own seam tape and drawcord, and it avoids welded construction on the main bag, which would push sampling from the standard 6-10 working day band into the 12-15 working day complex band. A cover stored in a base pocket with a drain grommet answers the real question, which is what happens when it rains for forty minutes.
Be deliberate about colour. Black is the default for this audience for good reasons: it does not draw attention to expensive equipment, and it hides field wear. A second colourway is a legitimate stretch goal, but remember that MOQ applies per colourway, so a black and a grey version is two 500-pcs commitments unless the volumes are combined in one production schedule and agreed in advance.
Tripod carry, harness and the load a photographer carries
A loaded camera bag is heavy in a way a daypack is not: 3 to 6 kg concentrated in a small volume, carried for hours, often over uneven ground. That load profile changes the harness specification. Webbing should be 38 mm or wider, the back panel should be a laminated foam structure with spacer mesh rather than a single sheet, and every attachment point should carry a stated bar-tack count in the operation sheet.
Tripod carry is a category-specific requirement that general-purpose bags omit. Two compression straps on the base with a fold-away tripod cradle, or a side pocket with a retaining strap, are both common solutions. The cradle is more secure and slightly more expensive; the pocket is cheaper and doubles as a water-bottle pocket. Decide during the design phase because both change the base pattern, and retrofitting either one during the second sampling round costs days rather than hours.
Empty weight for a 9-14 L camera bag with a full divider set typically lands between 1.1 and 1.8 kg. Publish the figure measured from the approved pre-production sample, not estimated from the design, because this audience weighs gear. A bag that arrives 250 g heavier than advertised is a disappointment that can be verified with a kitchen scale and will be reported in a review.
Back panel construction is the third element and it is specified, not chosen. A laminated foam panel with spacer mesh spreads load across the back; a moulded air-channel panel adds airflow at a cost of 6 to 12 percent and three to five sampling days. On a first run the laminated panel is the better value, because foam density and webbing grade determine whether the bag still feels right in month twelve.
Cost structure of a camera bag at 500 pcs
Camera bags cost more per unit than totes or pouches for three reasons: foam volume, divider labour and hardware count. The table below shows how typical specification choices move unit cost at a 500-pcs run. Treat the figures as indicative ranges to be confirmed against a real bill of materials, because fabric lot, hardware selection and labour content move them in both directions.
| Specification | Effect on unit cost | Effect on sampling window | Pledge value |
|---|---|---|---|
| Divider set increased from 3 to 6 pieces | +4-8% | No change | High; dividers are counted in photographs |
| Side-access panel with a three-sided zip | +5-9% | +2-4 working days | High; the feature working shooters look for |
| Back-panel access with a separate frame panel | +3-6% | +2-4 working days | Medium-high for the travel segment |
| Taped-seam rain cover in a base pocket | +2-4% | No change | High for field use; cheap relative to perception |
| 900D shell instead of 600D | +3-6% | No change | Medium; reads as durability |
| Coated base panel with feet | +2-4% | No change | Medium-high; prevents the most common wear complaint |
| Welded waterproof construction | +8-15% | +4-8 working days | Low relative to cost when a rain cover exists |
Two rows deserve attention. The divider set and the side-access panel are the two most expensive decisions on the table and also the two with the strongest link to pledge behaviour, so they should be funded first. Welded construction is the most expensive decision on the table and the one most easily replaced by a rain cover, so on a first campaign it is usually the wrong way to spend the budget.
Volume planning matters as much as specification. If the campaign sells 500 black bags and needs a second colourway, that second colourway is its own 500-pcs commitment under the standard MOQ. Combining both colourways into a single production schedule can sometimes be arranged, but only if the split is declared before the fabric order is placed. If flexible volume is the open question, the low MOQ bag production for creators page explains where the minimum sits and what a pilot run includes.
Freight is the line most often forgotten when this table is read. A structured camera bag ships at its own volume, so the cost impact of a specification that adds 15 mm to one dimension is paid twice: once in fabric and once in freight, across 500 units and again on every re-order.
Sampling and inspection for a camera bag run
Sampling runs 6-10 working days for a standard build and 12-15 working days for a complex one, and a camera bag with a side-access panel and a six-piece divider set sits in the standard band provided the configuration table is settled before round one. The single biggest cause of a second and third round in this category is a compartment geometry that was never tested against real equipment, so the most useful hour a creator can spend is the fit test.
| Check | Method | Why it belongs in the criteria |
|---|---|---|
| Divider count and repositionability | Remove and refit every divider in the sample | Confirms hook-and-loop coverage and panel stiffness |
| Kit fit against the published table | Load the named body and lens combinations | A compartment 10 mm short fails the campaign's central claim |
| Side-access operation under load | Open the access panel with the bag loaded and worn | Catches zip binding on a structured panel |
| Padding thickness on all six faces | Measured against the tech pack on a drawn sample | Padding is often reduced on the sides where it is not visible |
| Tripod strap and cradle attachment | Static load with a representative tripod | The highest-stress attachment point on the bag |
| Empty weight | Weighed against the published figure | A figure this audience verifies at home |
Pre-shipment inspection runs at AQL 2.5 to ISO 2859-1, and on a camera bag the functional checks matter more than the cosmetic ones. A divider set with four pieces instead of five is a critical defect to the backer who owns the fifth lens, even though it will pass any purely visual inspection. Agree the functional criteria in writing before the run starts; our page on Kickstarter campaign bag QA and QC sets out how those checks are documented alongside the standard cosmetic classes.
The revision list after round one should be written as measurements rather than impressions. The cavity is 8 mm short on height, the divider hook-and-loop coverage is insufficient on the third panel, the side-access zip binds over the lower 140 mm when the bag is packed. A list written that way is actioned in one pass.
Round two should be the last. Evaluate it by comparison rather than as a fresh assessment: measure the same dimensions, fit the same kit and re-check the access panel. Anything that changed without being requested is as important as anything that failed to change when it should have.
Positioning the tier on the campaign page
The campaign page for a camera bag should lead with the specification, not with the lifestyle. Open with the configuration table, follow with the access geometry and a demonstration of one-handed opening in the video, and only then move to materials and colour. The audience is making a comparison against bags they already own, and the comparison is completed on numbers. A page that leads with adjectives forces the backer to ask, and every unanswered question in the comments costs pledges.
- Publish the configuration table before launch. Named bodies and lenses with internal dimensions in millimetres.
- Show the divider set being reconfigured on camera. It takes twenty seconds and answers the most common question.
- Demonstrate one-handed access. The feature is the reason a working shooter upgrades.
- State empty weight and external dimensions. Both are verified at home and both affect freight.
- Photograph the approved sample, not a render. Shade, panel stiffness and zip line are visible in photographs.
- Answer the drone question if it applies. Cross-over backers ask whether a folded aircraft fits.
Comparison against other reward formats is worth including for backers new to the category. A laptop bag tier and a camera bag tier serve different kits and different audiences, and the custom laptop bags for Kickstarter page sets out where the device-compartment specification differs, which is useful when the same campaign runs both. If the plan is a single tech-organiser tier instead, the custom cable organiser bags for Kickstarter route is a far cheaper entry point into the same audience.
Finally, plan the update cadence around the production calendar. production 35-50 days after deposit and approved pre-production sample, and backers who understand that timeline are patient; backers who were promised a date that ignored sampling are not. Publishing the real calendar, including the 6-10 working days of sampling window, is the cheapest insurance a camera bag campaign can buy.
Scope a camera bag reward tier
Send the kit configuration table, divider count, access geometry and target quantity. Our programme coordinator returns fabric options, a unit cost band at three volumes and the sampling window within one business day. Write to service@junyuanbags.com or use the quote form.
- Minimum order quantity
- 500 pcs per style / colourway
- Sampling
- 6-10 working days (12-15 for complex builds)
- Bulk production
- 35-50 days after deposit + approved pre-production sample
- Inspection
- AQL 2.5 to ISO 2859-1
- Trade term
- FOB Xiamen
- Payment
- T/T 30/70
- Capacity
- 200,000 pcs per month
- Production floor
- 4,950 m2, SGS-verified
- Team
- 137 staff / 7 production lines / 149 machines
Frequently Asked Questions
Why do camera bags command higher reward values than other bag categories on Kickstarter?
Because the backer already owns expensive, fragile equipment and treats protection as a considered purchase rather than a gift. A camera bag reward typically sits at 79 to 189 USD against 25 to 45 USD for a printed tote. The category also has a precise specification language, so a campaign can publish dimensions and divider counts that a backer can compare against bags they already own.
How many dividers should a Kickstarter camera bag include?
Four to six is the working range for a 9 to 14 L bag. Below three the kit rattles in transit and above seven the interior becomes an organiser with no practical room for a camera. Each divider adds a cut panel, a laminated foam core, hook-and-loop tape on two faces and roughly one minute of assembly, so ask for the divider set priced separately at 500 pcs.
What padding thickness should a camera bag compartment use?
Eight to twelve millimetres of closed-cell foam on all six faces, not only on the base. Padding is frequently reduced on the side panels where it is not visible in photography, which is exactly where a bag takes an impact when it is set down. Specify the thickness in the tech pack so inspection can measure it on a drawn sample.
Should a camera bag open from the side, the top or the back?
Side access suits working shooters because the bag can be swung around on one strap and opened while standing. Top access is the cheapest to build and the most weather-resistant. Back-panel access suits travel and theft-conscious use because it cannot be opened while worn, and it adds 3 to 6 percent to unit cost because the opening panel still carries harness load.
How should capacity be stated so backers do not complain about fit?
Publish a configuration table with named bodies and lenses plus internal dimensions in millimetres, rather than a volume claim. A body with a battery grip is 20 to 30 mm taller and a lens with the hood reversed is 30 to 50 mm longer, so state whether the table assumes bare or gripped bodies and hooded or reversed-hood lenses.
Is a waterproof camera bag worth the extra cost on a first campaign?
Rarely. Welded construction adds 8 to 15 percent to unit cost and moves sampling from the 6-10 working day band into the 12-15 working day band. A taped-seam rain cover stored in a base pocket with a drain grommet answers the real field question for 2 to 4 percent of unit cost and keeps the sampling window short.
What does a camera bag cost to produce at 500 pcs?
Unit cost depends on foam volume, divider labour and hardware count. Moving from three to six dividers adds roughly 4 to 8 percent, a side-access panel adds 5 to 9 percent and a 900D shell instead of 600D adds 3 to 6 percent. Ask for the full specification priced at 500, 1,000 and 2,000 pcs before the pledge tier is fixed.
Can two colourways share one 500-pcs minimum order?
Not automatically. The minimum applies per style and per colourway, so black and grey are two commitments unless the split is declared before the fabric order is placed and both colours are scheduled in one production run. Declare the colour split in the RFQ rather than after the first sample is approved.
How much should a camera bag weigh empty?
A 9 to 14 L camera bag with a full divider set typically lands between 1.1 and 1.8 kg empty. Publish the figure measured from the approved pre-production sample rather than an estimate from the design, because this audience weighs gear and will report a bag that arrives 250 g heavier than advertised.
How is tripod carry specified on a camera bag?
Either two compression straps on the base with a fold-away cradle, or a side pocket with a retaining strap. The cradle is more secure and slightly more expensive; the pocket is cheaper and doubles as a bottle pocket. Decide during design because both change the base pattern and retrofitting costs days in the sampling window.
Which functional checks belong in a camera bag inspection?
Divider count and repositionability, kit fit against the published configuration table, side-access operation under load, padding thickness on all six faces, tripod attachment under static load and empty weight. At AQL 2.5 to ISO 2859-1 these functional criteria matter more than cosmetic classes, because a missing fifth divider is critical to the backer who owns the fifth lens.
How long does a camera bag take from sample approval to delivery?
Bulk production runs 35 to 50 days after deposit and approved pre-production sample, on top of a 6-10 working days of sampling window for a standard build or 12-15 working days for a complex one. Publish the real calendar in the campaign rather than a date that ignores sampling, because backers who understand the sequence are patient.
People Also Ask
Are camera bags a good Kickstarter reward niche?
Yes, because the audience owns expensive equipment and treats protection as a considered purchase. Reward tiers commonly sit at 79 to 189 USD against 25 to 45 USD for a tote. The trade-off is that this audience reads internal dimensions before copy and will test the fit claim publicly.
What makes a camera bag worth 150 USD to a backer?
A divider set that fits their actual kit, one-handed side access, real padding on all six faces and a tripod carry solution. Those four items are measurable and are what a photographer compares against the bag already on their shelf.
Should I publish litres or internal dimensions?
Internal dimensions in millimetres plus a named kit configuration. A litre figure alone tells the backer nothing about whether a body with a grip and a zoom with a reversed hood will fit, which is the question they are actually asking.
How many pledges should I plan the 500-pcs run against?
Against the core tier you expect to sell, not the entry tier. In camera bag campaigns the top two tiers typically collect 55 to 70 percent of funding, and the core bag tier is usually where the volume lands.
Do I need a rain cover or a waterproof bag?
A rain cover. It costs 2 to 4 percent of unit cost against 8 to 15 percent for welded construction, and it keeps sampling inside the 6-10 working day band. A cover with a drain grommet answers the field question that actually occurs.
Can the same bag carry a drone kit?
Sometimes, but the folded aircraft dimensions decide it. Measure the folded aircraft rather than the diagonal, and size the compartment to that. Cross-over backers will ask, so answer it in the configuration table before launch.