Bag Material Sample Kits: Testing Fabric, Hardware and Linings First
A material sample kit lets you test fabric, coating, lining, webbing and hardware before any bag is cut, and it is the cheapest place to make a decision in a whole programme. Choose candidate materials, run abrasion, colour fastness, water, load and finish checks, record the results, and write the chosen references into the tech pack. Doing this first keeps sampling inside the 6-10 working day window instead of discovering a material problem on a finished sample.
- What a material sample kit is
- Why test materials before the bag is built
- Fabric: what to test and how
- Coatings, finishes and water resistance
- Linings: the interior that gets forgotten
- Webbing, binding and trim
- Hardware: zips, buckles, adjusters and finishes
- Building the kit: what to ask for
- Running the tests
- Recording results into the tech pack
- Cost, timing and common mistakes
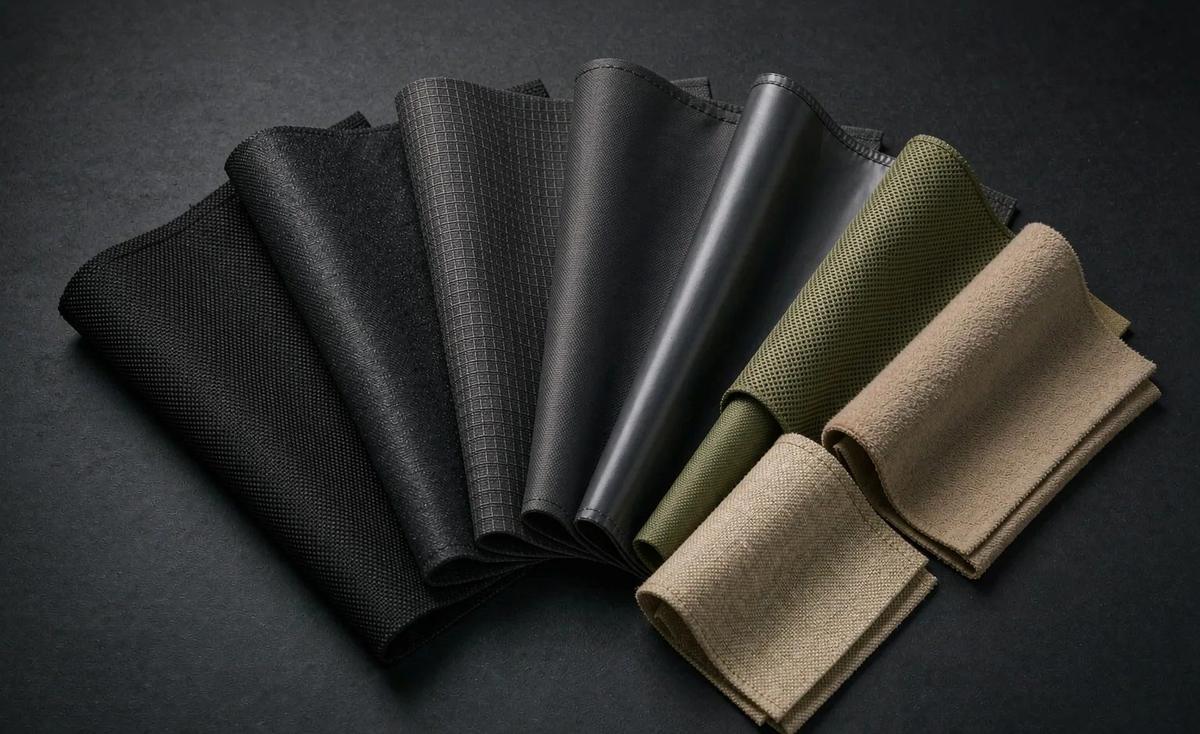
Most creators choose materials from a photograph or a specification sheet and then discover on the first sample that the fabric is too stiff, the lining is too light or the hardware finish marks easily. A material sample kit removes that whole category of surprise. It is a small board of candidate materials, labelled, that you can handle, abuse and compare before anything is cut.
The kit is the cheapest decision point in a bag programme. A material change decided on a swatch board costs nothing. The same change decided after a sample is built costs a round at 6-10 working days, and decided after bulk it costs the lot. Working in that order is the entire argument for doing this first.
What a material sample kit is
A kit is a curated set of physical candidates for every material and hardware line in your specification, cut to a usable size and labelled with its reference. Fabric swatches are typically A5 or larger so they can be folded and handled, webbing and binding come as short lengths, and hardware comes as loose pieces you can operate.
The labelling is what makes it a tool rather than a pile. Each item needs its reference, its weight or size, its finish and its colour code. Without labels the board becomes a set of nice rectangles and the eventual specification gets written from memory, which is how the wrong fabric ends up on the purchase order.
A useful kit usually contains two or three candidates per line rather than one. The comparison is the point: a 420D and a 600D version of the same weave behave differently, and choosing between them is much easier with both in hand than with a description of each.
Kits are also the natural place to settle colour. The same fabric in four stock colours on one board answers a colourway question in minutes, and it costs nothing, whereas the same question asked through sampling costs rounds. Our bag sampling and prototyping guide places the kit before the first build in the sequence.
One caution about what a kit is not. It is not a substitute for a sample of the finished bag, because material properties in isolation do not tell you how a construction will behave. A fabric that performs well on a board can still pucker at a seam or pull at a corner. The kit narrows the field, and the sample confirms the result.
Why test materials before the bag is built
The argument is about where mistakes are cheapest. On a swatch board a mistake costs nothing. On a sample it costs a round and possibly a setup. On a bulk lot it costs 500 pcs and a full 35-50 day window to redo. Every material decision should be pushed as far left in that sequence as possible.
There is a second argument specific to crowdfunding. The campaign page makes material claims: water resistant, abrasion resistant, recycled, vegan. Those claims need to be true and defensible, and the evidence is assembled during material selection rather than after production. A swatch board with test results behind it is that evidence.
- A material change on a board costs nothing.
- The same change on a sample costs a round at 6-10 working days.
- The same change in bulk costs the lot and a 35-50 day window.
- Claims on the campaign page need evidence assembled during selection.
- Hand feel cannot be judged from a specification sheet.
- Colour coordination across elements is only visible physically.
Hand feel deserves its own note, because it is the property backers notice first and the one no data sheet conveys. Two fabrics with identical specifications can feel different because of finish, calendering or coating method, and the only way to know is to hold them. A kit is how you hold them.
There is also a commercial benefit. Deciding materials early means the quotation is prepared against real references rather than assumptions, and quotations prepared against real references are comparable. That makes the choice between two partners a decision rather than a guess. Our material customisation guide covers the stock versus custom trade off in more depth.
Fabric: what to test and how
Fabric is the largest material decision in a bag and the one with the most properties to check. Six properties matter in practice: weight, weave, hand, tensile and tear behaviour, abrasion resistance and colour fastness. You do not need a laboratory for most of them, you need a board, a coin and a little patience.
Weight is stated in denier for nylon and polyester or in grams per square metre for canvas and heavier materials. Higher denier generally means a thicker yarn and a more abrasion resistant fabric, but it also means more weight and more stiffness. The right choice depends on where the fabric sits on the bag rather than on a general preference for heavier.
| Property | Simple check | What a fail looks like | Why it matters |
|---|---|---|---|
| Abrasion | Rub a coin across it 50 times | Pilling, shine, fibres rising | Base panels and straps wear first |
| Tear | Nick the edge and pull | Tears easily along the weave | Corner and seam failures |
| Hand | Fold and crush in the fist | Hard creasing or excessive stiffness | Affects drape and photography |
| Colour fastness | Rub with a damp white cloth | Colour transfers to the cloth | Stains light clothing |
| Water | Spray and watch | Wets through rather than beading | Claim on the campaign page |
| Coating | Crease sharply and release | Coating cracks or flakes | Looks worn within weeks |
The coin rub test is crude and genuinely useful. Rub a coin across the fabric fifty times and look at the result. A fabric that pills or goes shiny will do the same thing on the base of a bag within a few weeks of real use, and that is one of the most common complaints about reward bags.
Colour fastness is worth testing on any dark or saturated colour, particularly reds, navies and blacks. Rub the fabric with a damp white cloth and check for transfer. A fabric that crocks onto a light coloured shirt is a returns problem, and it is one you can find out about for the price of a cloth.
Where a formal number is needed, ask for a test report rather than inventing one. Abrasion can be measured by Martindale or Wyzenbeek methods and colour fastness has standardised scales, and our sourcing partner can obtain those reports for candidate materials. Ask at selection stage, not after the campaign makes the claim.
Coatings, finishes and water resistance
Most technical bag fabrics carry a coating, and the coating does as much work as the base weave. A PU coating gives water resistance and body, a TPU coating is more flexible and often used where a softer hand is wanted, and a DWR finish adds surface beading without sealing the fabric. Each behaves differently under creasing and abrasion.
Test the coating by creasing. Fold the swatch sharply, hold it for a few seconds and release, then look at the crease line under a light. A coating that cracks or shows white along the crease will do the same on a packed bag, and it will look worn quickly in the photographs backers take.
- PU coating: common, gives body and water resistance, can crease.
- TPU coating: softer hand, more flexible, often dearer.
- DWR finish: surface beading, wears off, needs reapplication.
- Taped seams: needed for genuine waterproof claims, not just resistant.
- Back coating: affects stiffness and how the fabric sews.
- Breathability: rarely relevant for bags, sometimes claimed anyway.
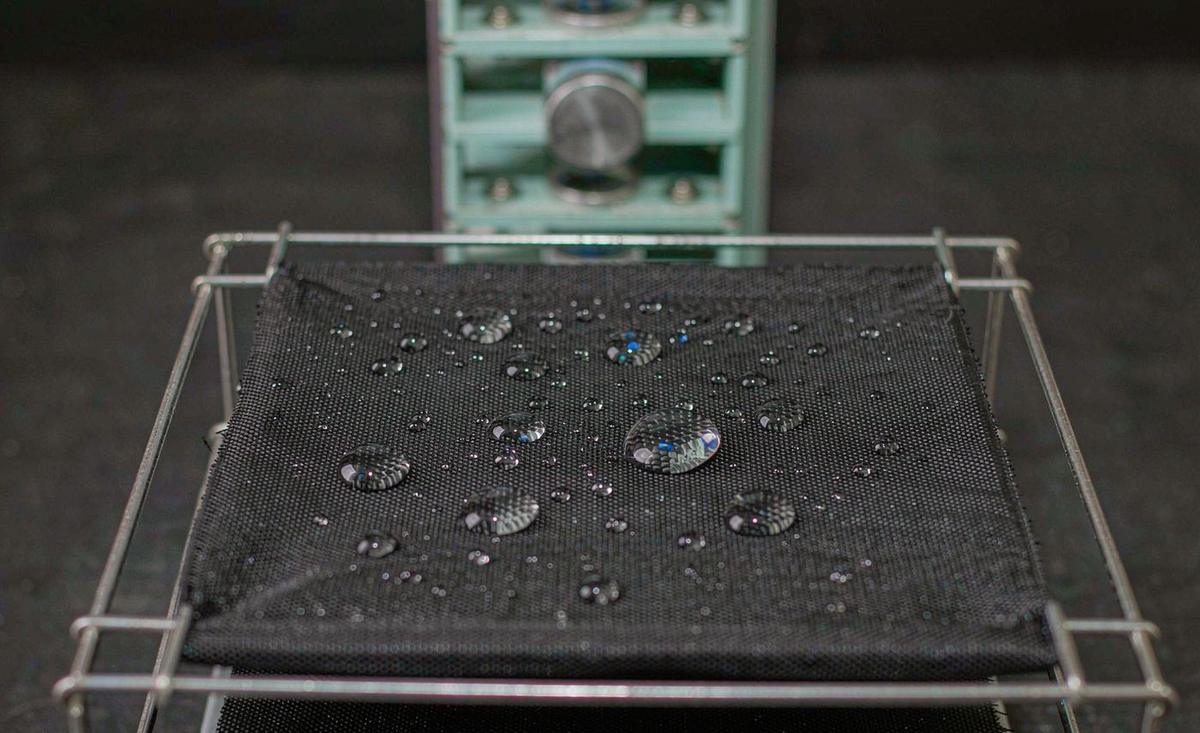
Water resistant and waterproof are different claims and the difference matters. Resistance means the fabric sheds light rain. Waterproofness generally requires taped or welded seams as well as a coated fabric, because water enters through the stitch holes. If your campaign page says waterproof, the construction has to support it.
Test water behaviour with a spray bottle rather than under a tap, because a tap applies far more water than a shower does. Spray, wait thirty seconds, and wipe. Beading that persists is a genuine result; wetting through at the fold lines tells you where the seams will need attention.
One more check that is easy to skip: how the coating affects sewing. A heavily coated fabric can resist needle penetration and produce skipped stitches or visible perforations along a seam. Ask our production team whether the chosen coating has caused sewing issues before, because that is a real and avoidable production problem.
Linings: the interior that gets forgotten
The lining is specified last, tested least and complained about most. Backers open a bag and look inside, and a lining that is too light, badly matched in colour or prone to snagging undermines an otherwise good product. It deserves an entry on the board and a few minutes of attention.
Lining weight is a trade off. A light lining saves weight and cost but snags, shows seam shadows and wears through at abrasion points. A heavier lining costs more and adds weight to a bag whose packed weight already drives shipping. The right answer depends on what the bag carries.
| Bag type | Lining priority | Typical choice | Failure to avoid |
|---|---|---|---|
| Tech or camera bag | Soft, non scratching | Brushed tricot or light polyester | Scratching device screens |
| Travel or duffel | Visible, easy clean | Darker polyester, wipeable | Stains that cannot be cleaned |
| Tote or everyday | Colour contrast | Matching or contrast polyester | Colour clash with the shell |
| Cosmetic or wash bag | Wipeable, sealed | Coated polyester | Liquid soaking into the lining |
| Kids bag | Durable, wipeable | Mid weight polyester | Tearing at pocket corners |
| Gift or premium | Hand feel | Satin or brushed finish | Looking cheap on opening |
Colour matters more for lining than most creators expect. A light lining makes contents easy to find and photographs well when the bag is opened, which matters because backers photograph open bags. A dark lining hides dirt. Both are legitimate and the choice should be deliberate.
Check the lining against the shell for shade coordination, and check it for show-through. Hold a light lining against a dark shell and see whether the shell colour reads through it. That is the kind of fault that is obvious in person and invisible in a specification sheet.
For a cosmetic or wash bag, wipeability is the whole requirement, and it is worth testing with something real. Put a drop of liquid on the lining swatch, leave it, and wipe. A lining that absorbs will stain permanently, and that is a returns category rather than a cosmetic issue.
Webbing, binding and trim
Webbing carries load and it is specified by width, weave and material. The two decisions that matter are whether the width matches the hardware and whether the weave suits the application. A 25 mm webbing with a 25 mm buckle is correct; the same webbing in a 20 mm buckle will bunch.
Polyester webbing is the common choice and it is fine for most applications. Nylon webbing is softer and has a better hand but it stretches more and absorbs water. For a strap that carries real weight, the stretch behaviour matters more than the feel.
- Width matches the hardware slot exactly.
- Weave suits the load: tighter for load bearing straps.
- Edge is soft enough not to abrade clothing or hands.
- Colour is part of the colourway and has its own standard.
- Binding matches or contrasts deliberately, and flexes at corners.
- Elastic or cord where used is tested for recovery after stretch.
Binding is the trim most likely to be chosen by default and regretted later. It has to flex around corners without puckering, and it has to match or deliberately contrast with the shell. Test it by folding a short length around a tight radius, because a binding that creases at a corner will crease on every corner of the bag.
Test webbing for edge comfort by drawing it across the inside of your forearm. A harsh edge on a strap that sits against clothing or skin generates complaints that read as a design fault. This is a ten second test and it is worth doing on every candidate.
Also check colour availability by width. A colour that exists in 25 mm webbing may not exist in 38 mm, and discovering that after the specification is written forces either a compromise or a custom dye with its mill minimum. Ask which widths stock colours are available in before finalising. Our tote sampling article covers the same checks on a handle led construction.
Hardware: zips, buckles, adjusters and finishes
Hardware is tested by operation rather than by appearance. Every piece on the board should be operated repeatedly: zips run, buckles released and re-engaged, adjusters set and loaded. A piece that looks right and feels wrong is a piece that will generate complaints.
Zips are the highest risk item. Check the gauge, the tape, the puller and the run, and run each candidate at least fifty times. A number five reversed coil is the usual choice for a main opening on a daypack, and a number eight or ten suits a duffel or a bag with a heavy loaded opening.
- Zip gauge: 3, 5, 8 or 10, matched to the application and the load.
- Tape colour: part of the colourway, checked by availability in that gauge.
- Puller: type, finish, and whether it can be branded.
- Buckles: release and re-engage ten times, no cracking or sticking.
- Adjusters: set a length, load it, check for slip.
- Finish: plating consistency, no sharp edges, no burrs.
Finishes deserve a specific test because plating faults are common and visible. Look at the edges and the inside of any curve, where plating is thinnest. Run a fingernail across the surface. A finish that chips at the edges on a sample will chip on the bulk lot and look cheap within weeks.
Metal hardware on a bag that folds or packs flat can mark the fabric it presses against. Put a metal piece against the shell swatch, press them together and leave them for a day. Any transfer or pressure mark is a finding worth acting on before 500 units are assembled.
Ask about stock versus custom for every hardware line. Stock hardware keeps sampling inside the standard 6-10 working day window, while a custom finish or a bespoke puller shape introduces tooling and can push a build toward the 12-15 working day range. Our travel bag sampling article covers hardware testing on a load bearing construction.
Building the kit: what to ask for
Asking for a kit is a short email, and being specific gets a better board. State the bag type, the intended use, the weight target, the colour direction and any claim you intend to make on the campaign page. Then ask for two or three candidates per line rather than one.
Ask for the kit to be labelled with references, and ask for the stock versus custom status of each item to be marked. That single column tells you which choices will keep the calendar tight and which will extend it, and it is often the most useful information on the board.
- Describe the bag type and use, including the weight it will carry.
- State the weight target for the finished bag.
- Give the colour direction, with references if you have them.
- List any claim you intend to make on the campaign page.
- Ask for two or three candidates per material and hardware line.
- Ask for stock or custom status to be marked on every item.
Ask also for a hardware size range where you are unsure. A buckle in 20 mm and 25 mm side by side with the webbing in both widths answers a question in seconds that would otherwise take a round to resolve.
If the bag has to meet a compliance requirement in a specific market, say so when you ask for the kit. Some markets restrict certain substances in coatings and hardware finishes, and knowing that at selection stage is far cheaper than discovering it at customs. Our tech bag compliance article covers the documentation side.
Running the tests
Testing should be structured and recorded, because an unrecorded test is an opinion. Use a simple sheet with one row per candidate and one column per test, and write the result rather than a feeling. The sheet becomes part of the pack and it settles later arguments.
Run the tests in a fixed order so they are comparable across candidates: appearance and hand first, then abrasion, then crease, then water, then colour fastness, then operation for hardware. Doing them in the same order on each candidate is what makes the comparison meaningful.
| Candidate | Abrasion 50 rubs | Crease | Water spray | Colour transfer | Verdict |
|---|---|---|---|---|---|
| 420D nylon PU | No pilling | Slight crease, recovers | Beads 30 s | None | Selected for shell |
| 600D polyester PVC | No pilling | Hard crease | Beads 60 s | None | Selected for base |
| 210D polyester lining | Pills at 30 rubs | Recovers | Wets through | None | Rejected for lining |
| Brushed tricot | N/A | Recovers | N/A | Slight | Selected for device pocket |
| 25 mm poly webbing | No fray | N/A | Dries fast | None | Selected, 25 mm |
| No.5 reversed coil | 50 cycles clean | N/A | N/A | N/A | Selected, main opening |
That table is illustrative rather than a result for your bag, but the shape is what matters. One row per candidate, one column per test, a verdict at the end. It takes twenty minutes to fill in and it removes an entire category of later disagreement.
Where a test result is borderline, ask rather than guess. Our campaign bag specialist will normally have seen the same material on other programmes and can say how it behaved in production, which is more useful than any laboratory number.
Test the combination as well as the parts. Put the chosen shell, lining and webbing together and look at them as a set, because a colourway is a coordinated set and three individually acceptable materials can be collectively wrong. That check is the whole point of a board.
Finally, test under the condition the bag will actually meet. If it is a gym bag, test with a damp cloth against the lining. If it is a travel bag, test abrasion on the base panel material specifically. Generic tests produce generic answers.
Recording results into the tech pack
The kit is only useful if its conclusions land in the specification. Each chosen material needs to be written into the pack as a reference with weight, weave, coating, finish and use area, and each rejected candidate is worth a one line note explaining why, so nobody reopens the question later.
Add the substitution column at this point as well. For each chosen line, name one acceptable alternative from the candidates you tested and say who may authorise it without asking you. Because the alternative has already been tested, that authorisation carries no risk and it removes the most common mid-build pause.
- Write the chosen reference with weight, weave, coating and finish.
- State the use area for each material on the bag.
- Record the rejected candidates and the reason, briefly.
- Add the substitution column naming one tested alternative per line.
- Note stock or custom status for every line.
- Attach the test record as an appendix to the pack.
Attaching the test record is the step almost nobody does and it pays off twice. It supports any claim on the campaign page, and it gives the later AQL 2.5 to ISO 2859-1 inspection something concrete to check materials against rather than a description.
Once the pack is updated, sampling can start against real references. That is what keeps the first round inside the quoted 6-10 working days, because no material question remains open when the build begins. Our tech pack guide shows where each of these entries belongs.
It is also worth recording what the kit cost and how long it took, because campaigns often re-order or launch a second colour later. A re-order placed months later against a documented material set is a one email transaction, while a re-order against a half remembered selection becomes a fresh sourcing exercise.
Cost, timing and common mistakes
A material kit is inexpensive and sometimes free against a subsequent order, and it should be asked for at the same time as the first quotation rather than after it. Asking early costs nothing and it shortens the quotation cycle, because the quotation can then be prepared against real references.
Timing is straightforward. Kits are assembled in days rather than weeks for stock materials. A custom dyed swatch or a lab dip takes longer because the mill sets that clock, and that is worth knowing before you plan a colour decision into a tight calendar.
| Request | Typical timing | What extends it |
|---|---|---|
| Stock fabric swatches | A few days | Special finishes or rare colours |
| Stock hardware samples | A few days | Specific gauge or finish combinations |
| Lab dip | One to two weeks | Difficult shades, repeated rounds |
| Custom weave or finish | Several weeks | Mill minimums and sampling |
| Compliance test report | One to two weeks | Third party laboratory scheduling |
| Full kit assembly | Usually under a week | Custom items inside the kit |
The most common mistake is choosing from a screen. A photograph of a fabric conveys colour approximately and hand feel not at all, and both properties decide how backers judge the product. Handle the material.
The second is testing in isolation. Choosing a shell fabric without the lining, the webbing and the hardware beside it produces a colourway that is assembled rather than coordinated, and the mismatch is visible on the finished bag. Test the set.
The third is forgetting that stock availability varies by specification. A colour available in one denier may not exist in another, and a webbing colour available in 25 mm may not exist in 38 mm. Confirm availability for the exact specification before writing it into the pack.
The summary is short and worth repeating. Ask for a labelled board with two or three candidates per line, run the crude tests, record the results, and write the chosen references and one tested alternative each into the pack. That is half a day of work and it is the cheapest insurance in a bag programme.
Want a material board for your bag? Send the bag type, weight target and colour direction to the contact quotation form or service@junyuanbags.com and we will assemble the candidates with stock status marked.
Frequently Asked Questions
What is a bag material sample kit?
A labelled board of physical candidates for every material and hardware line in your specification: fabric swatches, linings, webbing, binding and loose hardware pieces. Each item carries its reference, weight or size, finish and colour code, and the board lets you compare two or three options per line before anything is cut.
Why should I test materials before sampling the bag?
Because it is the cheapest place to make the decision. A material change on a board costs nothing, the same change on a built sample costs a round at 6-10 working days, and the same change in bulk costs 500 pcs and a 35-50 day window to redo.
How do I test fabric abrasion without a laboratory?
Rub a coin across the fabric fifty times and look for pilling, shine or raised fibres. Also nick an edge and pull to see how easily it tears along the weave. Where a formal number is needed, ask for a Martindale or Wyzenbeek test report at selection stage rather than after the campaign makes a claim.
What is the difference between water resistant and waterproof?
Resistance means the fabric sheds light rain. Waterproofness generally requires taped or welded seams as well as a coated fabric, because water enters through the stitch holes. If your campaign page says waterproof, the construction has to support the claim, not just the fabric.
How do I test a coating?
Crease the swatch sharply, hold it for a few seconds, release, and look at the crease line under a light. A coating that cracks or shows white will do the same on a packed bag. Also spray with water rather than running it under a tap, because a tap applies far more water than real rain does.
What should I check on a lining?
Weight against what the bag carries, snag resistance, colour coordination with the shell, show through, and wipeability if the bag will carry liquids. Hold a light lining against a dark shell to check for show through, and put a drop of liquid on a coated candidate and wipe it after a few minutes.
How do I choose webbing width and material?
Match the width exactly to the hardware slot, because 25 mm webbing in a 20 mm buckle bunches. Polyester is the common choice, while nylon is softer and has a better hand but stretches more and absorbs water. For load bearing straps, stretch behaviour matters more than feel.
What hardware tests should I run?
Run each zip at least fifty times, release and re-engage each buckle ten times, set each adjuster and load it to check for slip, and inspect plating at the edges and inside curves where it is thinnest. Press metal hardware against the shell swatch for a day to check for transfer marks.
How long does a material kit take to assemble?
Usually under a week for stock materials, sometimes a few days for fabric swatches and hardware samples. A lab dip takes one to two weeks, a custom weave or finish takes several weeks, and a third party compliance report takes one to two weeks depending on laboratory scheduling.
Does a material kit cost anything?
It is inexpensive and sometimes provided against a subsequent order. Ask for it at the same time as the first quotation rather than after, because it shortens the quotation cycle by allowing prices to be prepared against real references instead of assumptions.
How do I record the results?
Use one row per candidate and one column per test, with a verdict at the end: abrasion, crease, water spray, colour transfer and operation. Write the chosen reference into the tech pack with weight, weave, coating, finish and use area, and attach the test record as an appendix.
Why should I ask for stock or custom status on every item?
Because it determines the calendar. Stock materials keep sampling inside the standard 6-10 working day window, while a custom dye, a custom finish or a bespoke part introduces tooling and a mill minimum and can push a build toward the 12-15 working day range.
People Also Ask
What is a material sample kit?
A labelled board of candidate fabrics, linings, webbing and hardware you can handle and test before a bag is cut.
Why test materials first?
Changes on a board cost nothing, on a sample cost a 6-10 day round, and in bulk cost 500 pcs and a 35-50 day window.
How do I test fabric abrasion at home?
Rub a coin across it fifty times and look for pilling or shine. Nick an edge and pull to check tear behaviour.
Is water resistant the same as waterproof?
No. Waterproof generally needs taped or welded seams as well as a coated fabric, because water enters through stitch holes.
What lining should I choose?
Match weight to the load, check snag resistance and show through, and for liquids use a coated wipeable lining.
How do I test a zipper sample?
Run it at least fifty times including corners, then check gauge, tape colour and puller finish against the specification.
How long does a kit take?
Usually under a week for stock items. Lab dips take one to two weeks and custom weaves or finishes take several weeks.
Should I test the set or each part?
The set. Three individually acceptable materials can be collectively mismatched, and a colourway is a coordinated set rather than a single colour.